Matt
The Best Grasses for Backyard Putting Greens
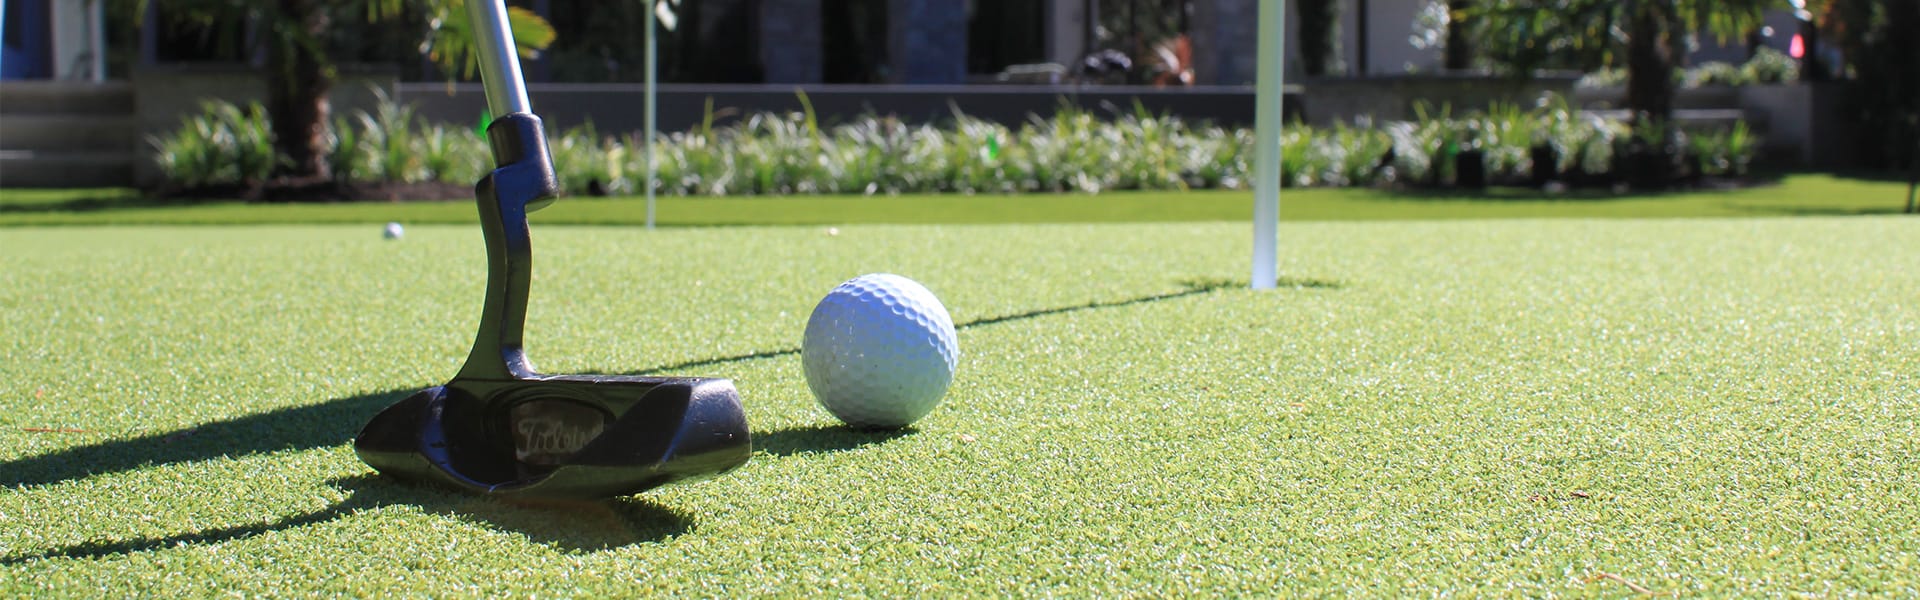 Building a backyard putting green is one of the most rewarding projects a homeowner-golfer can take on. But the difference between a surface that putts true and one that frustrates you every time comes down to one thing: the grass seed you choose.
After researching the top varieties used on professional courses and by serious DIY green builders, here are the best grass seeds for a home putting green — plus every essential product you’ll need to build and maintain one.
Quick Answer: Which Grass Is Best for a Putting Green?
For most homeowners in cool-season climates (USDA zones 4–7), creeping bentgrass is the gold standard. It’s the same species used on the vast majority of professional golf course greens. For warm-season climates (zones 7–10), hybrid bermudagrass varieties like Yukon and Monaco deliver excellent putting surfaces with better heat tolerance. If you want something lower-maintenance with decent shade tolerance, True Putt creeping bluegrass is a newer option worth considering.
Best Grass Seeds for a Home Putting Green
1. Outsidepride PC2.0 (Penncross) Creeping Bentgrass — Best Overall
Penncross has been the benchmark bentgrass variety since 1955, and the PC2.0 version is its modern evolution. This is the seed most DIY green builders should start with. It produces an extremely fine-textured, dense turf that can be mowed as low as 3/16 inch — right in the sweet spot for a true putting surface.
PC2.0 adapts to a surprisingly wide range of climates (USDA zones 4–10), performs well in sandy and well-drained clay soils, and competes aggressively against Poa annua — the weed that plagues greens worldwide. It requires only 1–2 pounds of nitrogen per 1,000 square feet annually, which is modest for a greens-grade grass. Sow at 1–2 pounds per 1,000 square feet and expect emergence in 3–5 days under optimal conditions (soil temps of 68–86°F).
Best for: DIY homeowners in most climates who want the closest thing to a professional putting surface.
Check price on Amazon (2 lb bag) | 1 lb bag also available
2. Outsidepride Crystal BlueLinks Creeping Bentgrass — Best for Shade
If your planned green gets some shade during the day — from a house, fence, or mature trees — Crystal BlueLinks is the better bentgrass pick. It’s rated as the most shade-tolerant creeping bentgrass available and earned the highest turf quality scores across all locations in NTEP (National Turfgrass Evaluation Program) fairway and tee trials.
It has a distinctive blue-green color that looks stunning at putting-green height, and it shows good resistance to both brown patch and dollar spot — two fungal diseases that commonly plague bentgrass greens. The tradeoff is that it’s slightly less widely tested for home green use than Penncross, but experienced green builders regularly recommend it.
Best for: Greens that receive 5–7 hours of sun (rather than the ideal 8+) or have partial afternoon shade.

Click to learn more about this dense turf grass
3. Outsidepride Pure Select Creeping Bentgrass — Best Premium Bentgrass
Pure Select is a newer-generation bentgrass that descends from the legendary Penn A and Penn G lines — the varieties used on many of the world’s top-ranked courses. It has a dense, upright, and aggressive growth habit that produces an exceptionally uniform surface.
This is the pick for homeowners who want to go a step beyond Penncross and are willing to invest more time in maintenance for a noticeably faster, tighter putting surface. It’s more expensive per pound but covers the same area.
Best for: Experienced turf enthusiasts who want tournament-level green quality at home.
4. True Putt Creeping Bluegrass — Best Low-Maintenance Option
True Putt is a relatively new variety that’s generating a lot of interest among home green builders. It’s a creeping bluegrass (not a bentgrass) that forms an extremely dense turf at greens height — as low as 1/8 inch, with an optimum of 5/32 inch. What makes it stand out is the combination of drought tolerance, shade tolerance, and wear recovery that bentgrass can’t match.
It germinates faster than most bluegrasses when kept consistently moist, crowds out Poa annua even better than bentgrass, and develops deep roots that help it survive water stress. You can also blend it 50/50 with creeping bentgrass for a more resilient mixed green. The downside: ball roll won’t be quite as fast or smooth as a pure bentgrass surface.
Best for: Homeowners who want a playable backyard green without the intense daily maintenance schedule bentgrass demands.
5. Yukon Bermudagrass — Best for Warm Climates
If you live in the southern half of the U.S. (or the transition zone), bentgrass will struggle through summer heat and humidity. Yukon bermudagrass was developed by the Oklahoma State University Turfgrass Research Team in partnership with the USGA, and it’s one of the few seeded bermudas that can produce genuine putting-green quality turf.

Yukon is the most cold-tolerant bermudagrass available — it can be planted as far north as zone 6 — and uses up to 25% less water than other bermuda varieties. It thrives in full sun, handles heavy foot traffic, and offers excellent spring green-up and late fall color retention. For greens, mow it at 1/4 inch or lower.
Best for: Homeowners in zones 6–10 who need a heat-tolerant, drought-resistant putting surface.
6. Monaco Bermudagrass — Best for Southern Putting Greens
Monaco is a premium seeded bermudagrass bred specifically for golf course use. It has a genetically darker green color than most bermudas, excellent density, and strong wear tolerance. It green-ups earlier in spring than competing varieties and holds its color deeper into fall.

Monaco is a solid choice for dedicated southern putting greens where you want that deep green look without the expense and complexity of installing sod-only hybrids like TifEagle or Tifdwarf. It’s best in full sun, USDA zones 7–10.
Best for: Southern homeowners who want a dark, dense bermuda green from seed.
Quick Comparison: Putting Green Grass Seeds at a Glance
| Variety | Type | Best Zones | Mow Height | Shade Tolerance | Maintenance |
|---|---|---|---|---|---|
| PC2.0 Penncross | Creeping Bentgrass | 4–10 | 3/16″–5/16″ | Low | High |
| Crystal BlueLinks | Creeping Bentgrass | 4–9 | 3/16″–5/16″ | Best in class | High |
| Pure Select | Creeping Bentgrass | 4–9 | 3/16″–5/16″ | Low | Very High |
| True Putt | Creeping Bluegrass | 3–8 | 1/8″–1/2″ | Good | Moderate |
| Yukon Bermuda | Bermudagrass | 6–10 | 1/4″ or lower | None | Moderate–High |
| Monaco Bermuda | Bermudagrass | 7–10 | 1/4″ or lower | None | Moderate–High |
How to Choose the Right Seed for Your Green
The most important factor is your climate. If summer temperatures regularly exceed 90°F and you experience high humidity, go with a bermudagrass. If you’re in the northern half of the U.S. or at elevation, bentgrass is the clear winner.
The second factor is how much time you’re willing to invest. A bentgrass putting green is essentially a small, high-maintenance garden. You’ll be mowing 4–6 times per week during the growing season, monitoring for fungal disease, and topdressing with sand at least twice a year. If that sounds like more than you bargained for, True Putt creeping bluegrass gives you a functional green at a fraction of the upkeep.
Sun exposure matters too. Putting greens need at least 8 hours of direct sun for bentgrass or bermuda. If your yard falls short, Crystal BlueLinks bentgrass or a True Putt/bentgrass blend gives you the best shot at success in partial shade.
For a deeper look at how different grass species grow, spread, and perform, see our guides to bermudagrass, cool-season grasses, and how grass spreads.
How to Build a Backyard Putting Green From Seed
Building a natural grass green isn’t as complicated as you might think, but it does require careful planning. Here’s the process in broad strokes.
Step 1: Choose Your Location
Pick a spot with at least 8 hours of direct sunlight, good air circulation, and natural drainage away from the site. Avoid low-lying areas where water pools. A south-facing slope is ideal in most of the U.S.
Step 2: Prepare the Foundation
Remove existing turf and grade the area so surface water drains in at least two directions. Most home greens work well on native soil (as long as it’s not heavy clay). Sandy loam is ideal. For serious builders, USGA guidelines recommend subsurface drainage tiles, though many successful home greens skip this step.
Compact the base thoroughly and test it by rolling a ball — if it bounces or veers unpredictably, you need more grading and compaction.
Step 3: Install Cups and Seed
Set regulation putting cups into the compacted base before seeding. Sow your chosen seed at the recommended rate (1–2 lbs per 1,000 sq ft for bentgrass), keep the surface consistently moist, and expect germination in 3–14 days depending on soil temperature.
Step 4: Establish and Maintain
Begin mowing once the grass reaches about 1/2 inch — roughly 21 days after emergence. Gradually lower your mowing height over several weeks until you reach your target (5/32″–1/4″). Use a reel mower designed for greens — standard lawn mowers can’t cut low enough.
For more on getting your mowing height right, keeping blades sharp, and watering best practices, we’ve got detailed guides.
Essential Amazon Products for Your Putting Green
The seed is just the beginning. Here’s everything else you’ll need to build and maintain a home putting green — all available on Amazon.
Greens Reel Mower
This is the single most important piece of equipment after the seed itself. Standard rotary lawn mowers — and even most push reel mowers — cannot cut low enough for a putting green. You need a dedicated greens mower with 11+ blades that can cut at 1/8″ to 3/4″. The Hudson Star Classic-Cut is one of the most popular options for home greens, and several motorized greens mowers are available on Amazon in the $300–$1,500 range.
If you’re also looking for a mower for the rest of your yard, check out our guides to the best zero-turn mowers and best robotic lawn mowers.
Regulation Golf Cups and Flagsticks
You’ll need regulation 4.25-inch cups sunk into your green, plus flagsticks so you can actually see the hole from a distance. KINGTOP makes a popular cup-and-flagstick set on Amazon that fits PGA/USGA specifications and works perfectly for backyard greens.
Shop golf cups and flagsticks on Amazon
Golf Hole Cutter
A hole cutter lets you create new cup positions so you can change the layout and practice different putts. Look for one with an adjustable depth stop, foot ejector, and a resharpenable blade. Professional-style cutters are available on Amazon for $30–$80.
Shop golf hole cutters on Amazon
Stimpmeter
A stimpmeter is the tool used to measure green speed on every professional golf course. It’s a simple aluminum bar that releases a ball at a consistent angle — you measure how far the ball rolls and that gives you a numerical speed reading. Home greens typically target a stimpmeter reading of 8–10 (tournament greens run 11–13). It’s not essential, but it’s the best way to track how your maintenance is affecting playability.
Topdressing Sand
Topdressing with fine sand improves green speed, smooths the surface, and helps control thatch buildup. Professional courses topdress every few weeks, but home greens only need it at least twice per year — once in early May and again in late September. Look for kiln-dried topdressing sand on Amazon in 50-lb bags.
Shop topdressing sand on Amazon
Fungicide for Greens
Bentgrass in particular is susceptible to dollar spot, brown patch, and pythium. A preventive fungicide program is critical for keeping a natural putting green healthy. Scotts DiseaseEx and BioAdvanced Fungus Control are two widely available options on Amazon that work well for home greens.

Shop lawn fungicides on Amazon
Lawn Fertilizer (Low-Nitrogen)
Putting greens need lighter, more frequent fertilization than a regular lawn. Look for a fertilizer with a ratio in the 16-0-8 or similar range — moderate nitrogen, low phosphorus. Liquid fertilizers like Simple Lawn Solutions work well because they allow precise, even application on a small area. For a full breakdown of how often to fertilize, see our guide.
Shop lawn fertilizers on Amazon
Core Aerator
Putting greens should be core-aerated at least twice per year to relieve compaction and promote healthy root growth. A manual step-on core aerator works fine for a small home green. For more on the process, see our guide to aerating and dethatching your lawn.
Sprayer for Liquid Applications
A small pump sprayer (1–2 gallon) is essential for applying liquid fertilizer, fungicides, and wetting agents evenly across your green. This is one area where precision matters — a broadcast spreader won’t give you the coverage control you need on such a small, high-value area.
What About Synthetic Putting Greens?
Artificial turf is a legitimate alternative — especially for homeowners who want zero maintenance. Synthetic greens cost roughly $1,800–$9,000 installed (depending on size) and require no mowing, watering, or fertilizing. The tradeoff is that they don’t replicate the feel, speed variability, and satisfaction of a real grass surface. They also heat up significantly in direct sun, which can be uncomfortable in warm climates.
If you’re considering synthetic turf, you might also want to look into our guide on backyard ideas without grass for additional inspiration.
Maintenance Schedule at a Glance
| Task | Frequency | Notes |
|---|---|---|
| Mowing | 4–6x per week | Use a greens reel mower at 5/32″–1/4″ |
| Watering | As needed | Deep and infrequent; early morning only |
| Fertilizing | Every 2–4 weeks | Light apps; 1–2 lbs N per 1,000 sq ft/year |
| Topdressing | 2x per year minimum | Fine sand in May and September |
| Core Aeration | 2x per year | Spring and fall |
| Fungicide | Preventive schedule | Critical for bentgrass; less for bermuda |
| Cup Relocation | Weekly | Prevents wear patterns around the hole |
Is a Natural Putting Green Worth It?
Honestly, it depends on your commitment level. A natural grass green is a labor of love — think of it more like tending a garden than maintaining a lawn. If you enjoy the process and love golf, there’s nothing like stepping into your backyard and sinking putts on real grass you grew yourself. The total cost for a modest 500-square-foot green (seed, drainage materials, soil amendments, and a used greens mower) can come in under $2,000 — a fraction of what a synthetic installation costs.
The payoff is a putting surface that improves your short game, adds genuine curb appeal, and gives you one of the most unique backyard features in any neighborhood.
For more lawn projects and landscaping ideas, explore our guides to budget-friendly front yard landscaping and small backyard garden ideas.
Best Generac Transfer Switches
A power outage doesn’t just knock out your lights — it can shut down your well pump, kill your irrigation timer mid-cycle, and leave a sump pump powerless while water creeps toward your foundation and freshly graded lawn. If you already own a generator, a transfer switch is the piece that ties everything together, routing backup power to your home’s electrical panel safely and (in many cases) automatically.
Generac is the dominant name in residential backup power, and their transfer switch lineup covers everything from affordable manual kits for portable generators to whole-house automatic switches with smart load management. Below, we break down the most popular Generac transfer switches available on Amazon, explain how each one fits into a homeowner’s setup, and help you pick the right model for your property.

Why Lawn-Focused Homeowners Should Care About Transfer Switches
If you’ve invested time and money into a thick, healthy lawn, a prolonged power outage can undo weeks of progress. Here’s what’s at stake:
Irrigation systems. Most in-ground sprinkler controllers run on household power. Lose electricity during a July heat wave and your turf can start browning within days — especially cool-season grasses that are already stressed by summer heat.
Well pumps. Rural homeowners who water from a private well lose all water pressure during an outage. No well pump means no hose, no sprinkler, and no way to apply liquid fertilizer or herbicide treatments.
Sump pumps. A failed sump pump during a heavy rain event can flood a basement or crawlspace, saturate the soil around your foundation, and drown low-lying turf. That’s a recipe for fungal problems like red thread or worse.
Refrigeration for lawn chemicals. Some liquid concentrates and biological products (like certain grub treatments) need to stay within a temperature range. Extended outages during temperature extremes can ruin a season’s worth of product.
A transfer switch ensures your generator can power these critical circuits the moment the grid goes down — without running extension cords across your yard.
Manual vs. Automatic Transfer Switches: What’s the Difference?
Before diving into specific models, it helps to understand the two main categories.
Manual transfer switches (MTS) are designed for use with portable generators. When the power goes out, you wheel out your generator, plug it into a power inlet box on the side of your house, start the generator, and flip the switch to move selected circuits from utility power to generator power. They’re less expensive and a great starting point for homeowners who already own a portable generator.
Automatic transfer switches (ATS) are paired with permanently installed standby generators. They monitor your utility power 24/7. When an outage is detected, the ATS signals the generator to start and automatically transfers your electrical load — often within seconds. When utility power returns, the switch moves the load back and shuts down the generator. No human intervention required.
Generac’s clever HomeLink line blurs the boundary between the two: you start with a manual switch for your portable generator, and when you’re ready to upgrade to a standby unit, an electrician can swap the controller panel to make it automatic — no new switch needed.
Generac Transfer Switches Compared
The table below covers the most popular Generac residential transfer switches you’ll find on Amazon. Prices fluctuate, so we’ve listed approximate street prices at the time of writing — always check the current listing for the latest number.
| Model | Type | Amps | Circuits | Enclosure | Key Features | MSRP |
|---|---|---|---|---|---|---|
| 6852 HomeLink 30A MTS | Manual | 30A | 8–10 | NEMA 1 (Indoor) | Upgradeable to auto; electronic rocker switch; power indicator lights; pre-wired | ~$300 |
| 6853 HomeLink 30A Kit (Resin Inlet Box) | Manual Kit | 30A | 8–10 | NEMA 1 (Indoor) | Includes 10 ft cord + resin power inlet box; same upgradeable switch as 6852 | ~$400 |
| 6854 HomeLink 30A Kit (Aluminum Inlet Box) | Manual Kit | 30A | 8–10 | NEMA 1 (Indoor) | Same as 6853 but with more durable aluminum inlet box | ~$420 |
| 9854 HomeLink 50A MTS | Manual | 50A | 8–16 | NEMA 1 (Indoor) | Higher capacity for larger generators; expandable to 16 circuits; upgradeable to auto | ~$380 |
| 9855 HomeLink 50A Kit (Aluminum Inlet Box) | Manual Kit | 50A | 8–16 | NEMA 1 (Indoor) | Includes 10 ft cord + aluminum inlet box; full kit for 50A portable generators | ~$500 |
| RXSW100A3 100A ATS | Automatic | 100A | Whole House | NEMA 3R (Indoor/Outdoor) | Service entrance rated; Digital Power Management (DPM); manages up to 4 HVAC loads; 5-year warranty | ~$709 |
| Generac 200 amp RXSW200A3 200A ATS | Automatic | 200A | Whole House | NEMA 3R (Indoor/Outdoor) | Service entrance rated; DPM for 4 HVAC loads; compatible with Smart Management Modules; 5-year warranty | ~$869 |
| RXG16EZA1 16-Circuit ATS | Automatic | 100A | 16 (Pre-Wired) | NEMA 1 (Indoor) | Integrated load center; pre-wired for fast install; designed for 8–24 kW generators; essential-circuit coverage | ~$929 |
| RXG16EZA3 16-Circuit ATS | Automatic | 100A | 16 (Pre-Wired) | NEMA 3R (Indoor/Outdoor) | Same as RXG16EZA1 but in weather-rated outdoor enclosure | ~$629 |
Note: All prices are approximate and may vary. We recommend checking Amazon for current pricing and availability. Generac transfer switches are also widely available at Home Depot, Lowe’s, and authorized Generac dealers.
Our Top Picks by Situation
Best Budget Option: Generac 6852 HomeLink 30A Manual Transfer Switch
If you already have a portable generator in the 3,000–7,500 watt range, the 6852 is the most cost-effective way to get a proper transfer switch installed. At around $300 for the switch alone (or roughly $400 as the 6853 kit with cord and resin inlet box), it’s an accessible entry point. You select 8 circuits — think: well pump, sump pump, refrigerator, furnace, and a few lights — and use the electronic rocker switch to move between utility and generator power.
The upgrade path is the real selling point. When you’re ready for a standby generator down the road, your electrician swaps the internal controller to make it automatic. That saves you the cost of buying an entirely new transfer switch.
Best for Larger Portable Generators: Generac 9854 / 9855 HomeLink 50A
If you run a bigger portable generator (10,000+ watts) — the kind that can power a central air conditioner along with your essential circuits — the 50-amp HomeLink gives you room to grow. It supports up to 16 circuits, which means you could back up your irrigation controller, well pump, garage (where you charge your robotic mower), and still have circuits left for indoor essentials. The 9855 kit bundles the switch with an aluminum inlet box and 10-foot cord for a cleaner install.
Best Whole-House Automatic: Generac RXSW200A3 200A ATS
Paired with a permanently installed Generac standby generator (typically 16–24 kW for most homes), the 200-amp automatic switch is the set-it-and-forget-it solution. It monitors utility power around the clock and transfers your entire electrical panel to generator power within seconds of an outage — no trips to the garage, no pulling a starter cord in the rain.
The built-in Digital Power Management technology is worth noting: it can manage up to four HVAC loads without any additional hardware, intelligently shedding and restoring loads to prevent overloading the generator. For homeowners with large properties, multiple HVAC zones, and irrigation systems on a well, this is the model to get.
Best for Essential-Circuit Coverage: Generac RXG16EZA3 16-Circuit ATS
Not every homeowner needs (or wants to pay for) whole-house coverage. The 16-circuit pre-wired automatic transfer switch lets you select exactly which circuits get backed up — your well pump, sump pump, irrigation controller, refrigerator, furnace, garage, and a handful of outlets. It’s less expensive than a whole-house switch and pairs well with smaller standby generators in the 8–16 kW range. The NEMA 3R version (RXG16EZA3) can be mounted outdoors, which simplifies installation if your electrical panel is in an awkward interior location.
What to Look for When Choosing a Generac Transfer Switch
Match the amp rating to your generator. A 30-amp manual switch works with most portable generators in the 3,000–7,500 watt range. A 50-amp switch handles larger portables up to about 17,500 watts. Automatic switches at 100A or 200A are sized for standby generators and your home’s electrical service — your electrician will help determine which you need.
Count your essential circuits. Think about what you absolutely need during an outage. For lawn-focused homeowners, that list often includes the well pump, sump pump, irrigation controller, garage circuit (for mower and tool charging), and at least one outdoor outlet. Add your household essentials — furnace, fridge, a few lights — and you’ll have your circuit count.
Indoor vs. outdoor enclosure. NEMA 1 enclosures are indoor-only and must be installed next to your breaker panel. NEMA 3R enclosures are weatherproof and can go outdoors, which can simplify wiring runs to an exterior-mounted standby generator. If your main panel is in the basement and your generator sits outside, a NEMA 3R outdoor switch might save installation labor.
Service entrance rated vs. non-service entrance rated. A service entrance rated (SER) switch sits between the utility meter and your main panel. It acts as the main disconnect for your home. Non-SER switches install downstream of your existing main breaker. Your electrician and local code requirements will determine which type you need — most whole-house installations use service entrance rated switches.
Upgrade path. If you’re starting with a portable generator but plan to go standby eventually, the HomeLink series saves you money long-term. Buying a non-upgradeable manual switch now means replacing it entirely when you upgrade — the HomeLink’s controller swap is significantly cheaper.
Installation: What to Expect
Transfer switch installation is not a DIY project for most homeowners. It involves working inside your home’s main electrical panel, and in many jurisdictions it requires a permit and inspection. Generac recommends installation by a certified, licensed electrician.
For a manual HomeLink kit, expect the installation to take an electrician 2–4 hours. The switch mounts next to your existing breaker panel, the selected circuits are wired into the transfer switch, and a power inlet box is mounted on the exterior wall. Total installed cost (parts + labor) typically runs $800–$1,500 depending on your area and the complexity of the installation.
Automatic transfer switches for standby generators are usually installed as part of the full generator installation package. The ATS, generator, and all wiring are typically handled together by a Generac-certified installer. Whole-system installed costs range from $5,000–$15,000+ depending on generator size, switch type, and local labor rates.
Frequently Asked Questions
Can I install a Generac transfer switch myself?
Generac strongly recommends professional installation by a licensed electrician. Transfer switch work involves your home’s main electrical panel and carries risks of shock, fire, and dangerous backfeed to utility lines if done incorrectly. Most jurisdictions also require a permit. That said, if you’re a licensed electrician or have equivalent experience, the HomeLink kits are designed to be straightforward to wire.
Do I need a transfer switch if I have a portable generator?
Legally and safely, yes — if you want to power hardwired appliances like your furnace, well pump, or sump pump. These appliances can’t be powered with extension cords. A transfer switch also prevents backfeed, which is a dangerous condition where generator power flows backward through your panel into the utility lines, potentially electrocuting line workers.
Will a transfer switch work with a non-Generac generator?
The HomeLink manual switches work with any portable generator that has compatible GFCI outlets (most modern portables do). The automatic transfer switches (RXSW, RXG series) are designed specifically for Generac standby generators with Evolution or Nexus controllers — they will not work with other brands’ standby units.
What size generator do I need to run my well pump and irrigation system?
Most residential well pumps draw between 1,000–3,000 watts (with a startup surge of 2–3x that amount). An irrigation controller itself uses minimal power, but the pump supplying water to the system is the heavy draw. A 7,500-watt portable generator can typically handle a well pump plus several other essential circuits. For whole-house coverage including central AC, you’ll want a 16–24 kW standby unit. Generac’s online sizing calculator can help you determine the right size for your specific setup.
How does the HomeLink upgrade from manual to automatic work?
When you purchase a Generac standby generator, your electrician orders the HomeLink upgrade kit (model 6869, sold separately). They swap out the manual controller panel inside the HomeLink enclosure with the automatic panel and new faceplate. The existing wiring stays in place. The switch then communicates with the standby generator’s controller to handle automatic transfer — no new switch box needed.
Bottom Line
A transfer switch is one of those investments that pays for itself the first time the power goes out during a critical stretch of your lawn care season. Whether you’re protecting a well-fed Kentucky bluegrass lawn from a summer drought caused by a dead well pump, or keeping your sump pump running so your freshly aerated yard doesn’t turn into a swamp, reliable backup power is part of complete property care.
For most homeowners starting out, the Generac HomeLink 30A kit (model 6853 or 6854) is the sweet spot — affordable, practical, and future-proof. If you’re ready to go all-in on standby power, the RXSW200A3 200A automatic switch paired with a whole-house Generac generator is the gold standard.
Whichever route you choose, make sure a licensed electrician handles the installation. Your lawn — and your utility workers — will thank you.
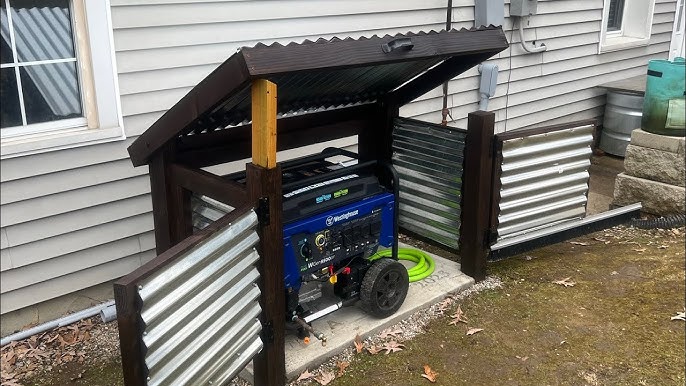
Best Plants and Shrubs to Screen a Generator
Planting around a generator isn’t like planting anywhere else in your yard. You need species that stay within bounds, tolerate heat and exhaust fumes, won’t send roots into underground utility lines, and provide coverage year-round — not just in summer when everything looks good.
Get the plant selection wrong and you’ll end up with overgrown shrubs blocking airflow, deep roots cracking your gas line, or deciduous plants that drop their leaves in winter and expose the generator exactly when it’s most likely to run.
This guide covers the best plants and shrubs for screening a home generator, organized by type, with specific variety recommendations and planting guidance for each.
What to Look for in Generator Screening Plants
Before diving into specific plants, here are the qualities that make a species a good (or bad) choice for generator screening:
Good qualities:
— Evergreen foliage (provides year-round coverage)
— Compact, upright growth habit (screens effectively without sprawling)
— Shallow, non-invasive root system (won’t damage underground lines or the generator pad)
— Heat tolerance (can handle radiant heat from the generator housing and warm exhaust air)
— Low to moderate mature height (3 to 8 feet is the sweet spot for most generators)
— Low maintenance (doesn’t require constant pruning to stay in bounds)
Red flags:
— Deep, aggressive root systems (maples, willows, most large shade trees)
— Deciduous plants as the only screening (bare in winter when you need them most)
— Fast-spreading groundcovers or vines that can climb into the generator housing
— Thorny plants that make maintenance access painful
— Heavy fruit or flower drop that clogs ventilation openings
Critical spacing rule: All plants must be set back at least 3 feet from every side of the generator. NFPA code prohibits vegetation taller than 12 inches within 3 feet of the unit. This means your shrubs need to be planted with their mature spread at least 3 feet from the generator housing — not 3 feet from where they are as small nursery plants. Plan for the full-grown size.
Evergreen Shrubs
Evergreen shrubs are the foundation of any generator screening plan. They provide the dense, year-round coverage that keeps the generator hidden in every season.
Boxwood
Best for: Formal, manicured screening in full sun to partial shade
Boxwood is the most popular screening shrub in American landscaping for good reason — it’s dense, compact, easy to shape, and stays green year-round. For generator screening, the best varieties are:
Green Velvet — Grows 3 to 4 feet tall and wide. Extremely dense, naturally rounded shape requires minimal pruning. Hardy to Zone 4. This is the best all-around choice for generator screening in northern climates.
Winter Gem — Similar size to Green Velvet but slightly faster-growing. Holds its dark green color well through winter. Hardy to Zone 5.
North Star — A dwarf variety that tops out at 2 to 3 feet. Good for smaller generators or tight spaces where a larger shrub would crowd the clearance zone.
Planting guide: Space boxwood 3 feet apart for a solid hedge, 4 feet apart for individual specimen plants. Plant the row at least 4 to 5 feet from the generator to account for the mature spread. Boxwood has a shallow, fibrous root system that won’t interfere with underground utilities.
Arborvitae
Best for: Tall, narrow screening in tight side-yard spaces
Arborvitae grows in a naturally columnar shape that’s ideal for screening in narrow spaces — like the typical side yard where generators often sit.
Emerald Green (Smaragd) — The classic choice. Grows 12 to 15 feet tall but stays only 3 to 4 feet wide. Dark green foliage year-round. Hardy to Zone 3. Space them 2 to 3 feet apart for a solid wall of green. Plant at least 4 feet from the generator.
North Pole — A more compact columnar arborvitae that reaches 10 to 15 feet tall and just 3 to 5 feet wide. Good for tighter spaces.
Little Giant — A globe-shaped dwarf variety that stays under 4 feet. Works well as a low screen when you don’t need full height coverage.
Important note: Arborvitae are deer magnets. If deer are a problem in your area, choose a different species or protect the plants with deer netting through the first few winters.
Holly
Best for: Shade-tolerant screening with year-round berries for visual interest
Holly thrives in the partial shade conditions that are common on the side of a house where generators typically sit. Several varieties make excellent generator screens:
Inkberry Holly (Ilex glabra) — A native evergreen that grows 5 to 8 feet tall with a dense, rounded habit. Unlike most hollies, inkberry has smooth, spineless leaves — making maintenance access much more comfortable. Tolerates wet soil, partial shade, and is deer-resistant. Hardy to Zone 4.
Gem Box Inkberry — A compact cultivar that stays 2 to 3 feet tall and wide. Excellent for low screening around smaller generators.
Winterberry Holly (Ilex verticillata) — A deciduous holly (it drops its leaves in winter) prized for its stunning red berries. Not ideal as a standalone screen because of the leaf drop, but beautiful as an accent mixed with evergreen shrubs. The berries persist well into winter and provide outstanding visual interest.
Blue Princess Holly — A broadleaf evergreen that grows 10 to 15 feet tall with dense, spiny foliage. Provides heavy coverage but the thorny leaves make it less comfortable for maintenance access. Plant it on sides where you won’t need to reach through.
Yew (Taxus)
Best for: Shade-tolerant, extremely dense screening
Yews are among the most shade-tolerant evergreen shrubs and produce exceptionally dense foliage. They’re slow-growing but incredibly long-lived and respond beautifully to shearing.
Hicks Yew — An upright columnar form that grows 10 to 12 feet tall and 3 to 4 feet wide. One of the best tall, narrow evergreen screens available. Hardy to Zone 4.
Dense Yew (Taxus x media ‘Densiformis’) — A wider, spreading form that grows 3 to 4 feet tall and 4 to 6 feet wide. Works well as a medium-height screen.
Caution: All parts of yew are toxic to pets and livestock. If you have dogs that might chew on landscape plants, choose a different species.
Ornamental Grasses
Ornamental grasses complement evergreen shrubs beautifully and bring movement, texture, and a relaxed feel to generator screening. Their open structure allows excellent airflow — a major advantage over dense shrubs.
Feather Reed Grass (Calamagrostis x acutiflora ‘Karl Foerster’)
Height: 4 to 5 feet · Spread: 2 feet · Zones: 4 to 9
The most popular ornamental grass for screening. Grows in tight, upright clumps that hold their shape well — even through winter. The feathery seed heads emerge in midsummer and persist into late fall, adding height and visual interest. Plant in a row of 3 to 5 clumps, spaced 2 feet apart and at least 3 feet from the generator.
Zebra Grass (Miscanthus sinensis ‘Zebrinus’)
Height: 5 to 7 feet · Spread: 3 to 5 feet · Zones: 5 to 9
Wider and more dramatic than feather reed grass, with distinctive horizontal gold bands on the leaves. Zebra grass creates a bold focal point that draws attention away from whatever’s behind it. Allow more space from the generator (at least 4 to 5 feet) to account for the wider spread.
Switchgrass (Panicum virgatum)
Height: 4 to 6 feet · Spread: 2 to 3 feet · Zones: 4 to 9
Native to North America and extremely low-maintenance. Varieties like ‘Heavy Metal’ (upright, blue-gray) and ‘Shenandoah’ (upright, red-tipped) offer different colors while maintaining the same screening function. Switchgrass handles heat exceptionally well, making it a strong choice near generators.
Little Bluestem (Schizachyrium scoparium)
Height: 2 to 4 feet · Spread: 1 to 2 feet · Zones: 3 to 9
A shorter native grass with outstanding blue-green summer color and coppery-orange fall color. Use it as a low screen for smaller generators or as a companion to taller shrubs.
For more on how grasses grow and spread, including the difference between clump-forming and spreading types, see our guide on how grass spreads.
Climbing Plants (For Lattice and Trellis Screens)
If you’ve installed a lattice panel or trellis near your generator, climbing plants can transform it into a living wall. The key is choosing climbers that stay manageable and won’t send runners into the generator housing.
Clematis — One of the best behaved climbers. Grows 6 to 12 feet on a trellis, produces stunning flowers from late spring through fall, and is easy to control with annual pruning. Most varieties are deciduous, so pair with an evergreen layer for winter coverage.
Climbing Hydrangea (Hydrangea anomala petiolaris) — A self-clinging vine that produces large white flower clusters in summer. Excellent for shade — perfect for the north side of a house. Slow to establish (2 to 3 years) but vigorous once mature.
Star Jasmine (Trachelospermum jasminoides) — Evergreen in Zones 8 to 10, with intensely fragrant white flowers in spring. One of the few climbing options that provides year-round foliage in warm climates.
Climbing Roses — Beautiful on a lattice screen but thorny, which complicates maintenance access. Best for sides of the generator where you don’t need to reach through.
Plants to avoid on trellises near generators: Wisteria (too aggressive, massive root system), English ivy (invasive, grows into everything), trumpet vine (very aggressive spreading). These will cause more problems than they solve.
Planting Layout: How to Arrange Screening Plants
The best generator screening uses a layered approach with plants at different heights, rather than a single row of identical shrubs.
The three-layer approach:
Back layer (tallest, farthest from generator): Columnar arborvitae or tall ornamental grasses (5 to 8 feet). These provide the primary height screen. Plant 5 to 6 feet from the generator to allow for mature spread.
Middle layer: Medium evergreen shrubs like boxwood or inkberry holly (3 to 5 feet). These fill the gap between the tall background plants and the ground. Plant 4 to 5 feet from the generator.
Front layer (shortest, nearest the viewer): Low ornamental grasses, dwarf shrubs, or flowering perennials (1 to 3 feet). These add color and texture at eye level and hide the bases of the taller plants behind them.
Leave access gaps: Don’t plant a complete ring. Leave the side closest to the driveway or service path completely open, or at minimum, use only easily movable potted plants on that side. Service technicians need clear access to all sides of the generator for maintenance.
For complete landscaping plans that combine plants with hardscaping, fencing, and accessories, see our full guide on landscaping ideas to hide a generator.
Maintenance Tips for Generator Screening Plants
Pruning: Keep all plantings trimmed so they don’t encroach into the 3-foot clearance zone around the generator. Most evergreen shrubs benefit from one shaping session per year in late spring or early summer. Ornamental grasses should be cut back to 4 to 6 inches in late winter before new growth emerges.
Watering: Newly planted shrubs and grasses need regular watering for the first year to establish roots. Once established, most of the species recommended here are low-water once mature. Avoid overhead sprinklers that spray directly on the generator housing — they can cause premature corrosion of the enclosure and electrical components.
Fertilizing: Feed screening shrubs once in early spring with a balanced slow-release granular fertilizer. Ornamental grasses generally don’t need fertilizer in average soil. Don’t apply fertilizer within 12 inches of the generator pad — runoff and granule accumulation around the base can cause issues.
Leaf and debris cleanup: During fall cleanup, pay special attention to clearing fallen leaves from around and inside the screening plantings. Leaves that pile up against the generator housing block ventilation and create habitat for rodents, which can damage wiring and control boards inside the unit.
Winter care: In heavy snow regions, gently brush snow off arborvitae and upright shrubs to prevent branch breakage. Snow and ice that accumulate around the generator must be cleared to keep vents and exhaust ports open during winter operation. If your generator runs on propane, also clear a path to the propane tank.
Quick Reference: Best Plants by Situation
Best overall screen: Boxwood (Green Velvet or Winter Gem) — compact, dense, low-maintenance, year-round green.
Best for narrow spaces: Emerald Green Arborvitae — tall and narrow, fits tight side yards.
Best for shade: Inkberry Holly or Hicks Yew — thrive in the partial shade common on house sides.
Best for airflow: Feather Reed Grass — open structure allows air to pass through freely.
Best for warm climates: Star Jasmine on a trellis with low ornamental grasses — evergreen coverage with good heat tolerance.
Best low-maintenance: Switchgrass or Little Bluestem — native, drought-tolerant, virtually maintenance-free.
Best for fast results: Arborvitae (grows 6 to 12 inches per year) combined with a no-dig privacy screen for immediate coverage while the plants grow in.
This post contains affiliate links, which means Finest Lawns may earn a small commission if you purchase through our links — at no extra cost to you. We only recommend products we’d use in our own yards.
How to Protect Your Lawn Around a Standby Generator
A standby generator is a great addition to your home — but it’s not great for the grass around it. Between exhaust heat, engine vibration, oil drips, debris buildup, and the foot traffic from annual maintenance visits, the patch of lawn surrounding a generator takes more abuse than almost any other spot in your yard.
The result is predictable: a ring of dead, brown, or thinning grass around an otherwise fine-looking lawn. It’s one of the most common complaints homeowners have after generator installation, and the good news is it’s completely fixable — and preventable.
Here’s how to protect your lawn around a standby generator, repair the damage if it’s already happened, and set up the area so you never have to deal with it again.
Why Generators Kill the Surrounding Grass
Understanding what’s causing the damage helps you target the right fix. There are four main culprits:
1. Exhaust heat. This is the biggest offender. The exhaust side of a standby generator (typically the left side as you face it) blows hot combustion gases directly outward and often slightly downward. During an extended outage — hours or even days of continuous operation — this exhaust stream can reach temperatures high enough to scorch the grass in a 3- to 6-foot zone. You’ll notice a fan-shaped brown patch extending from the exhaust port.
2. Radiant heat from the housing. Even on the non-exhaust sides, the generator housing gets warm during operation. Grass growing right up against the base of the unit dries out faster and browns more easily, especially during summer outages when the ambient temperature is already high.
3. Vibration and compaction. Generators vibrate when running. On softer soils, this vibration compacts the ground immediately around the pad, which reduces air and water penetration to the root zone. Over time, compacted soil produces thin, stressed turf that’s more vulnerable to heat and drought.
4. Debris and chemical exposure. Oil drips during maintenance, coolant residue, and the general accumulation of leaves, grass clippings, and debris around the base all contribute to a less-than-ideal growing environment for turf grass. If debris blocks ventilation openings, the generator also runs hotter, which compounds the heat damage to nearby grass.
How to Protect the Lawn (Prevention)
The best approach is to set up the generator area correctly from the start — ideally during or right after installation. If your generator is already installed, you can still retrofit these solutions.
Replace the Turf in the Exhaust Zone
Don’t fight the exhaust. Grass in the direct exhaust path is going to die during extended generator operation no matter what you do. Instead of replanting the same doomed patch every year, replace it with a non-living ground cover.
Remove the sod in a rectangular area extending at least 4 to 6 feet from the exhaust port and 2 to 3 feet wide. Lay landscape fabric and cover with decorative gravel, river rock, or lava rock. Border the area with steel landscape edging for a clean line against the remaining lawn. This eliminates the dead-grass problem permanently and actually looks better than a struggling patch of turf.
Create a Gravel or Rock Border Around the Full Pad
Extending a 12- to 18-inch gravel border around the entire generator pad provides a buffer zone that absorbs heat, prevents debris accumulation against the turf line, and gives maintenance technicians a clean surface to walk on without compacting your lawn.
This is the single most impactful thing you can do for the surrounding turf. It keeps the grass far enough from the heat sources that it stays healthy while giving the generator zone a finished, intentional look. For a complete walkthrough on setting up a rock garden or hardscaped border, see our guide on landscaping ideas to hide a generator.
Maintain Proper Clearances
NFPA code requires that no vegetation taller than 12 inches grows within 3 feet of the generator. This isn’t just a safety rule — it’s good for your lawn. Grass that’s allowed to grow right up to the generator housing traps moisture against the base, blocks airflow, and accumulates clippings and debris that decompose into a mat of organic material. Keeping a clean 3-foot perimeter prevents all of this.
If you prefer a green look rather than gravel, consider planting a low-growing ground cover like creeping thyme or sedum in the buffer zone. These stay well under 12 inches, tolerate heat and poor soil, and look far better than struggling turf grass.
Aerate the Surrounding Lawn Annually
The foot traffic from weekly self-test cycles (you or a technician checking on the unit) and annual maintenance visits compacts the soil in a ring around the generator. Aerating this area each fall (for cool-season lawns) or late spring (for warm-season lawns) relieves compaction and lets water and nutrients reach the root zone.
Pay special attention to the path you or the technician walks to reach the generator. If you notice a worn trail developing, consider installing a stepping-stone path to distribute foot traffic and protect the turf.
Keep Debris Cleared
Make it part of your regular lawn care routine to clear leaves, grass clippings, and other debris from around the generator base. This is especially important during fall yard cleanup, when leaves can pile up against the housing and block ventilation openings. Blocked vents cause the generator to run hotter, which increases heat damage to surrounding turf.
If you’re using a mower near the generator, blow clippings away from the unit rather than toward it. Clippings that accumulate inside the housing can clog air filters and create fire hazards.
How to Repair Lawn Damage Around a Generator
If your grass is already brown, dead, or thinning around the generator, here’s how to fix it.
Assess the Damage
First, determine what’s actually dead versus what’s just dormant or stressed. Yellowing or browning grass near a generator is often heat-stressed rather than dead. Try watering the area deeply for a week. If the grass greens up, it was dormant and will recover on its own with improved conditions. If it stays brown, it’s dead and needs to be replaced.
Repair Small Patches (Under 4 Square Feet)
For small dead spots, the repair is straightforward:
1. Rake out the dead grass and loosen the top 2 to 3 inches of soil with a hand cultivator.
2. Add a thin layer (half an inch) of compost or topsoil to improve the soil quality.
3. Apply grass seed matched to your existing lawn type. If you’re not sure what you have, our guides on cool-season grasses and warm-season varieties like Bermudagrass and Zoysiagrass can help you identify your turf.
4. Lightly rake the seed into the soil and keep the area consistently moist for 2 to 3 weeks until germination.
5. Once established, address the cause of the damage (exhaust heat, compaction, etc.) so the new grass doesn’t meet the same fate.
Repair Larger Areas (Over 4 Square Feet)
For bigger dead zones, overseeding or resodding is more effective than patching. Remove the dead turf completely, amend the soil, and either reseed or lay fresh sod. Fall is the best time for this work with cool-season grasses; late spring works best for warm-season lawns.
Before reseeding, make the preventive improvements described above — especially the gravel buffer around the pad and the exhaust-zone hardscaping. There’s no point in planting new grass in a spot where it’s going to die again.
Consider Replacing Turf With Alternatives
If you’re tired of repairing the same patch over and over, the most practical solution is to stop trying to grow grass there. Replace the problem area entirely with one of these alternatives:
— Decorative gravel or river rock with landscape edging — the lowest-maintenance option
— Creeping ground cover like thyme, sedum, or clover — green and living, but far more heat- and traffic-tolerant than turf grass
— A small rock garden with feature boulders and potted plants — turns a problem area into a landscape feature
For more ideas on replacing grass in tough spots, check out our guide on backyard ideas without grass.
Best Grass Types for Growing Near Generators
If you’re committed to keeping turf grass around your generator, some species handle the stress better than others.
Warm-season grasses: Bermudagrass is the most heat- and traffic-tolerant turf grass available. It recovers quickly from damage, spreads aggressively to fill bare spots, and handles the radiant heat from a generator housing better than almost any other grass. Zoysiagrass is another strong option — it’s dense, heat-tolerant, and handles foot traffic well.
Cool-season grasses: Tall fescue is the best cool-season choice near generators. It has the deepest root system of the common cool-season grasses, which makes it more drought- and heat-tolerant. It also handles foot traffic better than Kentucky bluegrass or fine fescues.
Grass to avoid near generators: Fine fescues (creeping red fescue, chewings fescue, hard fescue) and centipede grass are the least tolerant of heat stress and foot traffic. They’ll be the first to die in the generator zone.
Seasonal Lawn Care Around Your Generator
Spring: Clear winter debris from around the generator. Check for rodent nests inside the housing (they love the warmth). Inspect the surrounding lawn for winter damage and reseed bare spots. Resume regular fertilization of the surrounding turf.
Summer: Keep the 3-foot clearance zone trimmed and clean. Water the surrounding lawn adequately — the area near the generator tends to dry out faster due to reflected heat from the housing and concrete pad. Mow away from the generator to prevent clipping buildup against the housing.
Fall: This is the most critical season for generator-area maintenance. Clear fallen leaves regularly — they accumulate fast against the generator housing and can block ventilation. Aerate the surrounding lawn to relieve compaction. Overseed any thin or bare areas with a grass type suited to your climate.
Winter: Keep snow and ice cleared from around the generator — the unit needs clear vents and exhaust to operate safely during winter outages. Avoid piling plowed or shoveled snow against the generator housing, as it can block airflow and cause ice to form over ventilation openings. Salt and de-icer runoff from nearby walkways can also damage turf in the generator zone — if this is a concern, use calcium magnesium acetate instead of sodium chloride.
The Bottom Line
The grass around your generator doesn’t have to look terrible. The simplest fix is to stop fighting a losing battle — replace the immediate exhaust zone with gravel or decorative stone, maintain a clean buffer around the pad, and focus your lawn care efforts on the turf that’s far enough from the heat to actually thrive.
If you’re planning a full landscaping overhaul of the generator area, our guide on landscaping ideas to hide a generator covers everything from shrub screening to rock gardens to privacy fencing. And if you’re still in the market for a generator, our best home standby generators buyer’s guide can help you choose the right unit — including the yard placement considerations you should think about before installation day.
This post contains affiliate links, which means Finest Lawns may earn a small commission if you purchase through our links — at no extra cost to you. We only recommend products we’d use in our own yards.
Best Generator Pads, Covers, and Accessories for Your Yard
Your generator itself gets all the attention, but it’s the accessories around it that determine how well it holds up over time — and how good (or bad) that corner of your yard looks. A quality pad keeps the unit level and out of the mud. A fitted cover protects it from weather damage between outages. And the right accessories reduce noise, simplify maintenance, and prevent the kind of slow deterioration that leads to expensive repairs.
Below, we’ll cover the best generator pads, covers, enclosures, and accessories available on Amazon — all from the perspective of what works best for your yard and your lawn.
Generator Pads and Bases
Every standby generator needs a stable, level surface to sit on. The pad you choose affects the generator’s longevity, your yard’s appearance, and how much maintenance you’ll deal with over the years.
Precast Composite Pads (Best Overall)
Precast composite pads are the most popular option for residential installations. Brands like DiversiTech and GenPad make lightweight, durable pads specifically designed for home generators. They’re engineered to support the weight of residential air-cooled units (typically 300 to 500 pounds) without sinking or shifting.
DiversiTech UltraLite Pads are available on Amazon in multiple sizes to match common Generac, Kohler, and Champion footprints. The most popular sizes are 24 x 48 inches (for smaller units) and 36 x 48 inches (for 18kW+ models). They’re about 3 inches thick, weigh significantly less than concrete, and can be set directly on compacted soil or a thin gravel base.
GenPad Generator Mounting Pads are precast concrete pads with built-in zinc alloy mounting inserts that let you bolt the generator directly to the pad. This prevents the unit from shifting during operation or in high winds. GenPads are heavier than composite alternatives but offer superior stability and a more professional finished look.
Installation tip: For either type, prepare the site by removing the sod and 3 to 4 inches of topsoil, then laying a 2- to 3-inch base of compacted crushed gravel. This provides drainage and a stable surface. Level the pad carefully — a generator that’s even slightly tilted can develop oil distribution problems over time.
Poured Concrete Slabs (Most Permanent)
If you want the most stable, permanent foundation, a poured concrete slab is the gold standard. A typical generator pad is 4 to 5 inches thick, reinforced with wire mesh or rebar, and poured over a compacted gravel base.
Poured slabs are more expensive and time-consuming than precast pads — you’ll either need to hire a contractor or be comfortable with basic concrete work. But they won’t shift, settle, or tilt over time, even in areas with expansive clay soils or freeze-thaw cycles.
When to choose poured concrete: Flood-prone areas, regions with heavy frost heave, very large or heavy generators (liquid-cooled units), or when local building codes require it.
Compacted Gravel Beds (Budget Option)
The most affordable approach is a framed gravel bed. Remove the sod, dig down 4 to 6 inches, frame the area with pressure-treated 4×4 or 4×6 landscape timbers, fill with compacted crushed stone, and set the generator (on its factory-included plastic base pad) directly on the gravel.
Gravel beds drain well and are easy to construct, but they have a significant downside: they shift and settle over time. The generator will eventually tilt, requiring periodic releveling. This is especially common with generators that are heavier on one end (most are), as the heavy side sinks faster.
If you go this route: Use crushed stone (angular edges lock together) rather than pea gravel (round stones roll and shift). Compact the gravel in 2-inch lifts with a hand tamper or plate compactor. Frame the bed with timbers to prevent the stone from migrating into your lawn.
What to Put Around the Pad
Regardless of which pad type you choose, the area immediately surrounding the generator pad deserves attention. Left as bare lawn, it will eventually die from exhaust heat, foot traffic, and splash-back during rain — leaving an ugly brown ring around an otherwise clean installation.
Best options for the surrounding area:
— Extended gravel border: Extend a 12- to 18-inch band of matching gravel around the pad. Use steel or aluminum landscape edging to create a crisp line between the gravel and your lawn. This is the cleanest, lowest-maintenance option.
— Mulch bed: A mulch border works too, but keep it at least 12 inches from the generator housing to reduce fire risk and prevent debris from clogging the ventilation.
— Stepping stones: A short stepping-stone path from the nearest walkway to the generator provides clean, dry access for maintenance without creating a worn trail through your lawn.
If the turf around your generator is already damaged, our guide on how to revive dead grass fast can help you repair the surrounding lawn once you’ve addressed the base.
Generator Covers
Standby generators are designed for outdoor use and can handle rain, snow, and sun — but a quality cover extends the life of the housing, keeps debris out of the ventilation, and makes the unit look better between uses. There are two main categories: storage covers and running covers.
Storage Covers (When the Generator Is Off)
Storage covers protect your generator from UV damage, pollen, leaves, bird droppings, and general grime when it’s sitting idle — which is most of the time. They’re typically made from heavy-duty 600D or 900D Oxford fabric with waterproof coating and UV-resistant treatment.
What to look for:
— Correct sizing: Measure your generator (length x width x height) and buy a cover that fits snugly. A cover that’s too large flaps in the wind and can trap moisture underneath; too small and it won’t protect the full unit.
— Elastic hem or drawstring: This keeps the cover secure in wind. Covers with additional buckle straps or Velcro closures are more reliable in storms.
— Ventilation panels: Look for covers with built-in mesh vents that allow air to circulate underneath. This prevents condensation and moisture buildup inside the cover.
— Dark or neutral color: A black, gray, or green cover blends into landscaping better than a bright-colored one.
Top picks on Amazon: IGAN Pro-Max covers are a popular choice for portables in the 3,500W to 12,000W range — they’re heavy-duty, waterproof, and come with a windproof strap kit. For larger portables, QH.HOME and BOANEN make 900D covers in sizes up to 30 x 30 x 26 inches. Champion Power Equipment also makes model-specific covers for their inverter generators.
Important note for standby generators: Most permanently installed standby generators (Generac Guardian, Champion aXis, etc.) have weatherproof aluminum or steel housings and do not need aftermarket covers. Adding a cover to a standby unit can actually cause problems by trapping moisture and blocking ventilation. Only use covers on standby generators if recommended by the manufacturer.
Running Covers (When the Generator Is Operating)
Running covers allow you to operate a portable generator in rain or snow — something you should never do with an uncovered unit, as water can damage the electrical components and create shock hazards.
GenTent Storm Shield — One of the original and most trusted running covers. It mounts with a universal clamp system that fits most open-frame portable generators from 4,000W to 12,500W. It’s waterproof and NFPA flame-retardant. Champion sells a co-branded version specifically designed for their generators.
GenArmor Pro-Max Running Cover — A tent-style enclosure made from heavy-duty tarp material with a windproof kit included. It sets up quickly over the generator and provides rain protection while leaving the sides open enough for ventilation and exhaust.
IGAN Running Covers — Similar tent-style design to GenArmor, available in multiple sizes. They include clear windows so you can monitor the gauges and fuel level without opening the cover.
Generator Enclosures and Sheds
For homeowners who want to completely conceal a portable generator and reduce noise, purpose-built generator enclosures offer a more permanent solution than covers.
GDLF Generator Shed — Available on Amazon, these compact outdoor boxes feature built-in cooling fans and soundproof insulation. They’re designed for portable generators and serve double duty as weatherproof storage and noise reduction. The insulation can cut perceived noise levels noticeably, which your neighbors will appreciate during extended outages.
DIY shed option: If you’re handy, you can build a simple three-sided shed (open on the exhaust side) from pressure-treated lumber and line it with acoustic insulation panels. The key is ensuring adequate ventilation — never fully enclose a generator, even in a shed. Leave the exhaust side completely open and size the interior so there’s at least 3 feet of clearance on all sides.
For a more comprehensive look at screening options including fencing, lattice panels, and privacy screens, see our full guide on landscaping ideas to hide a generator.
Privacy Screens and Fencing
Privacy screens designed for concealing outdoor equipment (AC units, pool pumps, trash bins) work equally well for generators. The best options allow airflow while blocking sightlines.
No-dig vinyl privacy screens — Zippity Outdoor Products and Enclo make panels that stake directly into the ground with no post holes or concrete required. Most are 36 to 48 inches tall and 38 to 48 inches wide. Set up two panels in an L-shape to screen the generator from two sides while leaving the remaining sides open for airflow and access.
Wood privacy panels — BELLEZE and Enclo Richmond make cedar and composite wood panels that offer a warmer, more natural look than vinyl. These are especially effective when combined with landscaping around the base — a few shrubs or ornamental grasses planted in front of the panels softens the look considerably.
Metal louvered panels — Aluminum and steel louvered screens angle the slats to block sightlines from the front while allowing air to pass freely through the back. They’re the most durable option and require zero maintenance, but they’re also the most expensive.
Sizing tip: The screen should be at least as tall as your generator — ideally a few inches taller. Most residential standby generators are 24 to 36 inches tall, so a 42- to 48-inch screen provides adequate coverage with room to spare.
Noise Reduction Accessories
If generator noise is a concern — and it usually is during overnight outages — a few targeted accessories can make a meaningful difference.
Anti-vibration pads and mounts — Rubber anti-vibration pads placed between the generator and its mounting pad absorb mechanical vibration before it transfers to the ground and surrounding structures. This addresses one of the primary sources of generator noise. Available on Amazon in various sizes — look for pads rated for the weight of your specific generator.
Rubber washers for mounting bolts — A simple, cheap upgrade. Replacing the standard metal washers on the bolts that secure the generator to its pad with rubber washers dampens vibration transmission. Check your owner’s manual first to make sure this doesn’t affect the warranty.
Sound-deadening mats — Mass-loaded vinyl or acoustic foam panels can be applied to nearby fence panels or enclosure walls to absorb sound. These are more effective than the fence or wall alone, which only reflects sound rather than absorbing it.
Landscaping is also a surprisingly effective noise reduction tool. Dense evergreen shrubs, earth berms, and solid fencing between the generator and your living spaces all help. For a deep dive, see our guide on reducing generator noise with landscaping.
Cold Weather Accessories
If you live in a cold climate, your generator needs to start reliably in freezing temperatures — which is exactly when you’re most likely to need it.
Generac Cold Weather Kit — Available on Amazon for Generac 9kW through 22kW air-cooled standby generators. It includes a battery warmer pad (part #7101) and an oil heater pad (part #7102) that keep the battery and engine oil warm enough for reliable cold-start performance. If you live anywhere with regular winter temperatures below 0°F, this is a near-essential upgrade.
Battery maintainers/tenders — A trickle charger keeps the generator’s starting battery at full charge between outages. Most modern standby generators have built-in battery charging, but older units or portables may benefit from an external maintainer — especially in cold weather, which drains batteries faster.
Landscape Accessories
A few landscaping-specific accessories round out a clean generator installation:
Steel or aluminum landscape edging — Creates a crisp, permanent border between your generator’s gravel pad and the surrounding lawn. This prevents gravel migration and gives the installation a finished, professional look. Col-Met and EverEdge are popular brands available on Amazon.
Commercial-grade weed barrier fabric — Lay this under gravel beds and rock gardens around the generator to prevent weeds. The commercial-grade versions (typically 3 to 4 oz/sq yard) last far longer than the flimsy rolls sold at big-box stores.
Decorative gravel and river rock — Available on Amazon in bags for small projects. Pea gravel, river rock, and lava rock are all excellent choices for the area around a generator pad. Lava rock is especially good near generators because it’s lightweight, drains quickly, and won’t retain heat the way dark stone can.
For a complete landscaping approach that ties all of these elements together, our landscaping ideas to hide a generator guide walks through the full process from planning to planting.
Quick Reference: What to Buy
Essential (every generator installation needs these):
— A proper pad (precast composite or poured concrete)
— Landscape edging to define the generator zone
— Weed barrier fabric under any gravel or rock areas
Recommended (significantly improves the installation):
— Privacy screen or fencing (at least one panel for the most visible side)
— Anti-vibration pads
— Cold weather kit (if you’re in a freeze zone)
Nice to have (for a polished, professional look):
— Running cover (for portable generators)
— Decorative gravel or river rock around the pad
— Stepping-stone path for maintenance access
— Sound-deadening panels on nearby fencing
This post contains affiliate links, which means Finest Lawns may earn a small commission if you purchase through our links — at no extra cost to you. We only recommend products we’d use in our own yards.
Best Home Standby Generators

A home standby generator is one of those purchases you hope you’ll never need — until the power goes out at 2 a.m. in January and you’re very glad you have one. Unlike portable generators that you have to drag out of the garage and start manually, standby units are permanently installed in your yard and kick on automatically within seconds of a power failure. They run on your existing natural gas or propane supply, so there’s no scrambling for gasoline in the middle of a storm.
The market is dominated by a handful of brands, with Generac leading the pack as the number-one selling standby generator brand in the U.S. Below, we’ll compare the best home standby generators available on Amazon, break down how much power you actually need, and cover what to expect for installation — including what the generator means for your yard and landscaping.
How Much Power Do You Need?
Before comparing specific models, you need to figure out what size generator your home requires. Getting this right is critical — too small and the generator can’t keep up during a full outage, too large and you’ve overspent by thousands of dollars.
Quick sizing guide:
10kW (10,000 watts) — Covers essential circuits only: refrigerator, sump pump, well pump, a few lights, phone chargers, and your Wi-Fi router. This is the entry-level choice for smaller homes or homeowners who only want to keep the basics running. It will not power your central air conditioning or electric range.
14kW to 18kW — The sweet spot for most homes. A 14kW unit handles essential circuits plus a few comfort items like a window AC unit or microwave. An 18kW unit can manage a small central air conditioning system (up to about 3 tons) along with the essentials. These sizes fit the majority of homes under 2,500 square feet.
22kW to 26kW — Whole-house coverage for mid-size to large homes. A 22kW generator can power a 3- to 4-ton central AC system, electric water heater, kitchen appliances, and most of your home’s circuits simultaneously. The 24kW and 26kW models are for larger homes with higher electrical demands — multiple AC zones, electric ranges, hot tubs, or large workshops.
A note on fuel type: Most home standby generators run on either natural gas or liquid propane (LP). If your home has a natural gas line, that’s the most convenient option — unlimited fuel supply, no tank to refill. If you’re on propane, you’ll need a tank large enough to run the generator for extended outages. A 500-gallon tank is a common minimum for standby generator use. Keep in mind that generators produce slightly less power on natural gas than on propane, so check the specs for both fuel ratings.
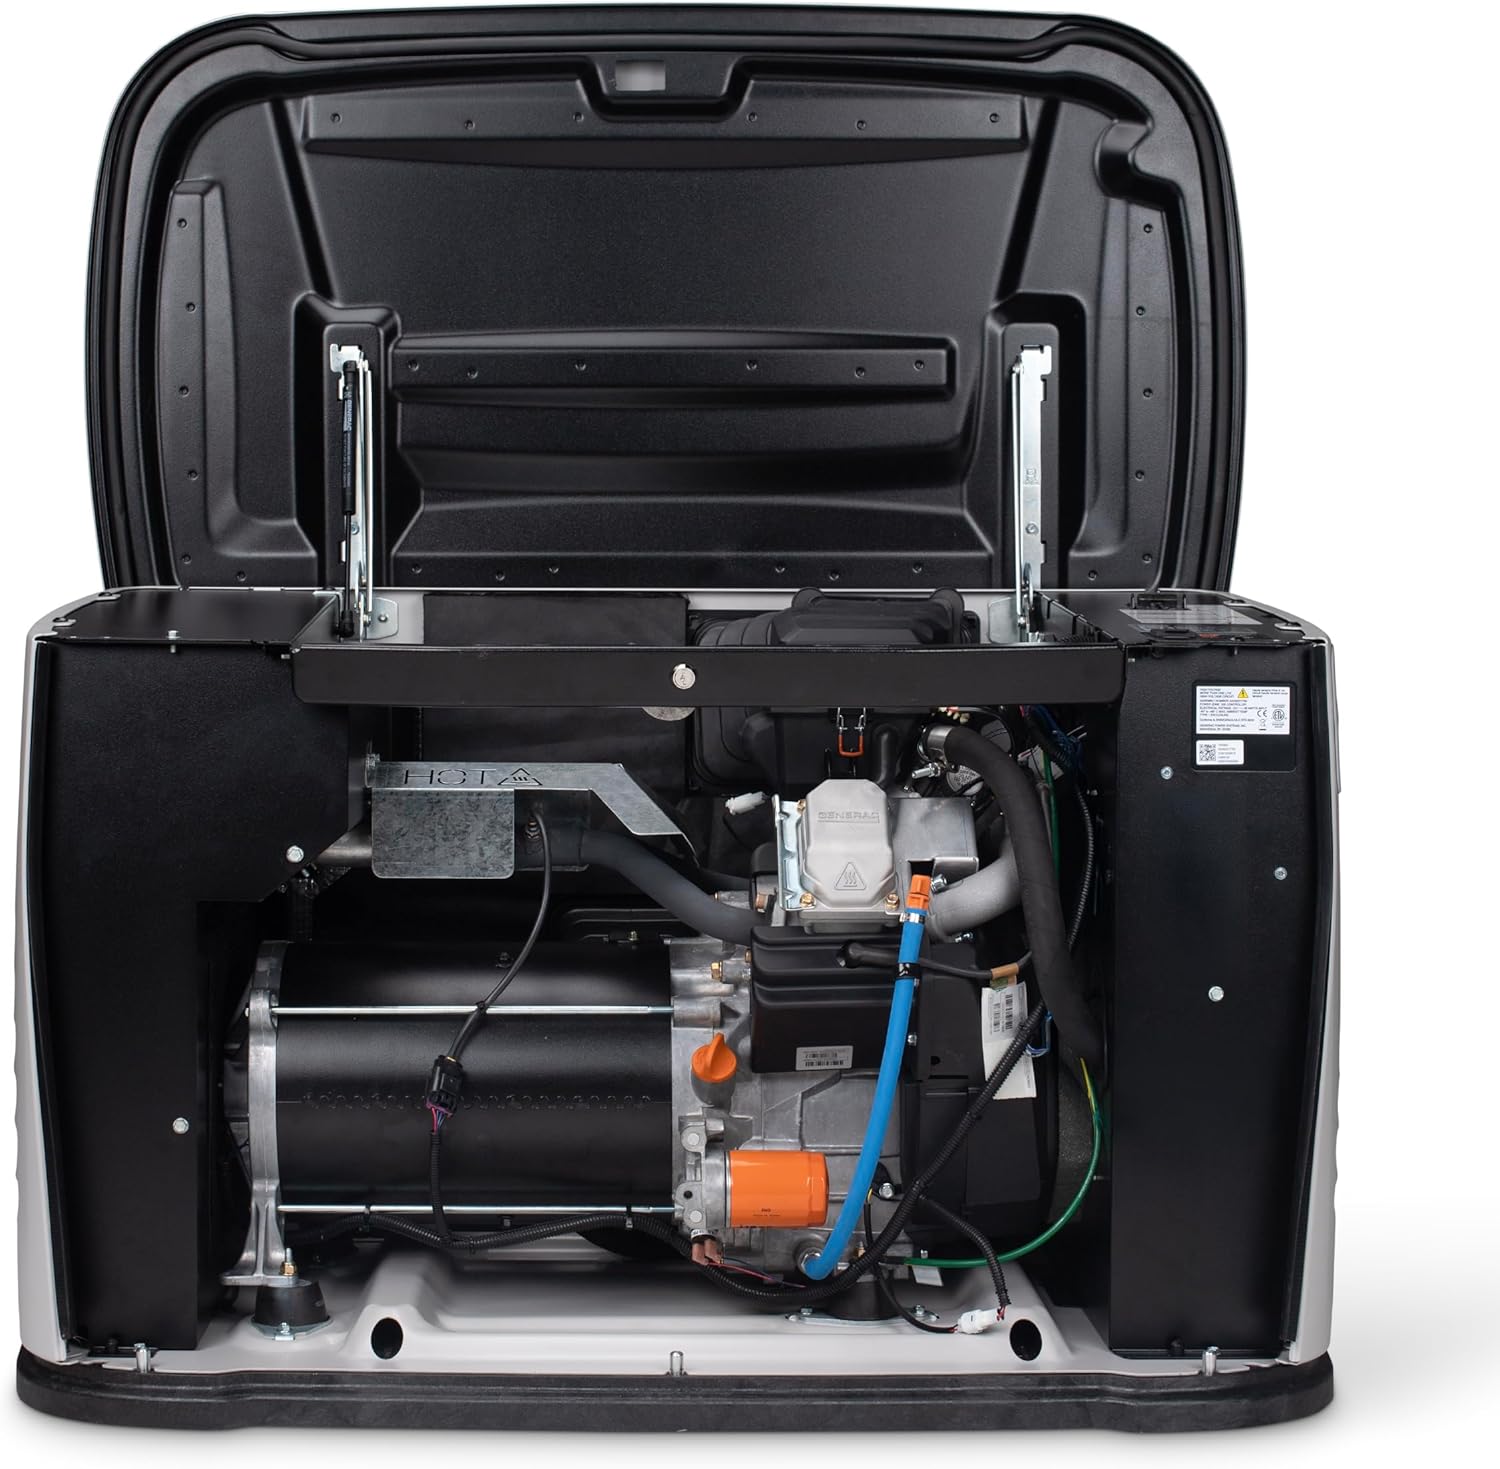
Best Generac Home Standby Generators
Generac dominates the home standby market, and for good reason. Their Guardian Series offers a complete lineup from 10kW to 26kW, all engineered and assembled in the U.S.A. Every current Guardian model includes WiFi connectivity through Generac’s Mobile Link system, which lets you monitor your generator’s status, receive maintenance alerts, and check run history from your phone.
All Guardian Series generators feature Generac’s True Power Technology, which delivers clean, stable electricity with less than 5% total harmonic distortion — safe for sensitive electronics like computers and smart home systems. They also include a Quiet-Test self-test mode that runs at lower RPM, keeping the weekly exercise cycle quieter than the competition.
Generac Guardian 10kW

Best for: Essential circuit coverage in small homes
The entry point into the Guardian lineup. The 10kW model powers your most critical systems — refrigerator, sump pump, well pump, furnace, lights, and a handful of outlets. It pairs with a 100-amp automatic transfer switch that covers up to 16 essential circuits.
At roughly 48 x 25 x 29 inches, it has the smallest footprint in the lineup, making it the easiest to tuck into a side yard or conceal with landscaping. The compact size also means less visual impact on your yard.
Key specs: 10,000 watts (LP) / 9,000 watts (NG) · 100-amp transfer switch · WiFi enabled · 5-year limited warranty
Generac Guardian 14kW
 Best for: Essential circuits plus comfort items in small to mid-size homes
The 14kW model steps up from essentials into comfort territory. It can handle everything the 10kW covers plus a window AC unit, microwave, dishwasher, and additional lighting circuits. Available with either a 100-amp (16-circuit) or 200-amp (whole house) transfer switch — the 200-amp version is worth the upgrade if your electrical panel supports it, as it eliminates the need to choose which circuits to back up.
Key specs: 14,000 watts (LP) / 14,000 watts (NG) · 100A or 200A transfer switch options · WiFi enabled · 5-year limited warranty
Generac Guardian 18kW
Best for: Most mid-size homes with central air conditioning
This is where whole-house backup becomes realistic for the average American home. The 18kW model can run a small central AC system (2 to 3 tons), electric water heater, kitchen appliances, and your full lighting package simultaneously. For homes under 2,500 square feet with a gas furnace and 2- to 3-ton AC, this is often the right-size choice.
Key specs: 18,000 watts (LP) / 18,000 watts (NG) · 200-amp transfer switch · WiFi enabled · 5-year limited warranty
Generac Guardian 22kW

Best for: True whole-house coverage for mid-size to large homes
The national best-seller. The 22kW Guardian is the most popular home standby generator in the country, and it’s the model most installers recommend for homes between 2,000 and 4,000 square feet. It powers a 3- to 4-ton central AC system, all kitchen appliances including an electric range, laundry equipment, and every circuit in most homes.
If you’re unsure what size to get and your home is a typical 3-bedroom with central air, this is the safe choice.
Key specs: 22,000 watts (LP) / 19,500 watts (NG) · 200-amp transfer switch · WiFi enabled · 5-year limited warranty
Generac Guardian 24kW

Best for: Larger homes with higher electrical loads
The 24kW model is for homes that push the limits of the 22kW — larger AC systems (4 to 5 tons), electric vehicle chargers, workshops, or homes with multiple high-draw appliances running simultaneously. It comes standard with a 200-amp service-entrance-rated transfer switch.
Key specs: 24,000 watts (LP) / 21,000 watts (NG) · 200-amp SE-rated transfer switch · WiFi enabled · 5-year limited warranty
Generac Guardian 26kW

Best for: Large homes and maximum coverage
The flagship of the Guardian lineup. The 26kW model delivers the most power in Generac’s air-cooled residential range and is designed for homes over 4,000 square feet or those with exceptionally high electrical demands. It’s the right choice if you want true “everything on” capability during an outage — every circuit, every appliance, no compromises.
The 26kW is the largest unit in the lineup physically, so plan accordingly for your yard. It will require a bit more creative landscaping to conceal than the smaller models.
Key specs: 26,000 watts (LP) / 22,000 watts (NG) · 200-amp SE-rated transfer switch · WiFi enabled · 5-year limited warranty
Champion aXis 22kW Home Standby Generator
Best for: Homeowners who want Generac-level performance from an alternative brand
Champion is best known for their portable generators, but the aXis 22kW is their entry into the whole-house standby market — and it’s a strong one. It comes with a 200-amp whole-house automatic transfer switch and features Champion’s aXis intelligent load management, which prioritizes power delivery to your most critical circuits during high-demand periods.
One notable advantage: Champion’s customer support and warranty service have a strong reputation among homeowners. The aXis comes with a 10-year limited warranty on specific components, which is more generous than Generac’s standard 5-year coverage.
Key specs: 22,000 watts (LP) / 19,500 watts (NG) · 200-amp transfer switch · WiFi enabled · 10-year limited warranty (varies by component)
Westinghouse Tri-Fuel Portable Generators
Best for: Budget-conscious homeowners, renters, or those who want portability
If a permanently installed standby generator isn’t in the budget (they typically run $3,000 to $7,000+ before installation), Westinghouse’s tri-fuel portable generators offer serious backup power at a fraction of the cost. Their 12,500W to 28,000W models run on gasoline, propane, or natural gas — giving you maximum fuel flexibility during emergencies.
The trade-off: portable generators require manual setup during an outage, they’re louder than standby units, and they can’t legally be permanently wired into your home’s electrical panel without a transfer switch. But for many homeowners, a high-wattage portable paired with a manual transfer switch is a practical and affordable backup power solution.
Since portable generators are stored in a garage or shed and only set up outdoors during use, they don’t require the permanent landscaping considerations of standby units. However, you should still have a designated spot in your yard — a gravel pad or concrete slab at least 20 feet from the house — ready to go before storm season.
Key specs (28,000W model): 28,000 peak watts / 20,000 running watts · Tri-fuel (gas/propane/NG) · Remote electric start · Transfer switch ready · CO sensor
What to Expect for Installation
Buying the generator is only part of the equation. Installation is a significant project that involves electrical work, gas line connections, and concrete pad preparation.
Typical installation costs: $3,000 to $6,000 on top of the generator purchase price, depending on your area, the complexity of the electrical work, and how far the generator sits from your electrical panel and gas meter.
What’s involved:
— Pouring or placing a concrete generator pad (or preparing a compacted gravel bed)
— Running a gas line from your meter or propane tank to the generator
— Installing the automatic transfer switch at your main electrical panel
— Running electrical conduit from the transfer switch to the generator
— Obtaining permits and passing inspection (required in virtually all jurisdictions)
— Final testing and activation
Impact on your yard: Installation typically requires trenching for the gas line and electrical conduit, which means a strip of your lawn will be dug up. The good news is that trenches are usually only 12 to 18 inches wide and can be reseeded or sodded within a few weeks. If you’re planning to reseed the disturbed area, fall is the ideal time for cool-season grasses.
Placement considerations: Work with your installer to position the generator where it balances code requirements (at least 18 inches from the house, 5 feet from windows and doors, 5 feet from property lines) with your landscaping plans. Placing the unit close to both the electrical panel and gas meter reduces installation costs — but placing it on the side of the house least visible from the street makes your landscaping and curb appeal job much easier.
Maintenance and Your Lawn
Home standby generators run a brief self-test cycle weekly (typically 10 to 20 minutes) to keep the engine lubricated and verify everything works. This is normal and shouldn’t concern your neighbors — modern units run their test cycle at reduced RPM and are about as loud as a central AC condenser.
Annual professional maintenance is recommended and typically includes an oil and filter change, spark plug inspection, battery check, and a full load test. Make sure your landscaping allows clear access for the technician — a stepping-stone path from the nearest walkway to the generator is a practical and attractive solution.
Over time, generator exhaust can brown the grass immediately around the unit. If this is an issue, replacing the turf in the exhaust zone with gravel or decorative stone eliminates the problem permanently. For the surrounding lawn, regular fertilization and proper watering will keep everything looking healthy right up to the edge of your generator zone.
Which Generator Should You Buy?
For most homeowners, the decision comes down to how much of the house you want to power:
Just the essentials (lights, fridge, sump pump, furnace): Generac Guardian 10kW or 14kW
Essentials plus AC (the most common setup): Generac Guardian 18kW or 22kW
Everything, no compromises: Generac Guardian 24kW or 26kW
Alternative brand with strong warranty: Champion aXis 22kW
Budget-friendly portable option: Westinghouse 28,000W tri-fuel
Whichever model you choose, factor in the cost and timeline for installation, make sure your yard can accommodate the unit within code clearances, and start planning your landscaping concealment strategy early — ideally before installation day, so the landscaping and generator work can be coordinated together.
This post contains affiliate links, which means Finest Lawns may earn a small commission if you purchase through our links — at no extra cost to you. We only recommend products we’d use in our own yards.
Landscaping Ideas to Hide a Generator (Without Sacrificing Airflow or Access)
A standby generator is one of the smartest investments you can make for your home — until you step outside and see that big metal box parked next to your foundation. It’s not exactly the curb appeal upgrade you were hoping for.
The good news? You don’t have to choose between backup power and a beautiful yard. With the right combination of plants, hardscaping, and a few clever accessories, you can make your generator practically disappear — all while keeping it fully functional, properly ventilated, and accessible for maintenance.
Below, we’ll walk through the best landscaping ideas to hide a home generator, from quick weekend fixes to full-scale yard projects. Every approach keeps safety and airflow front and center, because a screened generator that overheats isn’t doing anyone any favors.
Before You Start: Safety Clearances You Need to Know
Before you plant a single shrub or hammer in a fence post, you need to understand the clearance requirements for your generator. Ignoring these can void your warranty, violate local building codes, or — worst case — create a fire or carbon monoxide hazard.
Here are the general rules most manufacturers and the National Fire Protection Association (NFPA) follow:
Minimum clearances for standby generators:
— 18 inches from the house (rear of the generator to the structure wall)
— 36 inches on the sides and front for airflow and maintenance access
— 5 feet from any windows, doors, or vents to prevent carbon monoxide from entering the home
— 5 feet from the property line (check your local codes — some municipalities require more)
— No vegetation taller than 12 inches within 3 feet of the unit per NFPA code
— 48 inches of overhead clearance — never place a generator under a deck, overhang, or low-hanging branches
These are minimums. Your specific generator model may require more space, so always check your owner’s manual. If your local code is stricter than the manufacturer’s recommendation, the local code wins.
The bottom line: Every landscaping idea in this guide respects these setback requirements. When we say “plant shrubs around your generator,” we mean around it at a safe distance — not pressed up against it like a hedge wall.
1. Evergreen Shrubs: Year-Round Screening That Grows With Your Yard
Evergreen shrubs are the single most popular way to hide a generator, and for good reason. They provide dense, year-round coverage that blends naturally into your existing landscaping. Unlike a fence or screen, they don’t look like you’re trying to hide something — they just look like part of the yard.
Best evergreen shrubs for screening a generator:
Boxwood — The classic choice. Boxwood is compact, dense, and easy to shape. It grows slowly enough that you won’t be fighting it back from your generator every season. A row of three to four Green Velvet or Winter Gem boxwoods planted 3 to 4 feet from the unit creates a clean, formal screen. They top out at 3 to 4 feet tall, which is ideal for most residential generators.
Arborvitae (Emerald Green) — If you need more height, Emerald Green arborvitae grows in a narrow, columnar shape that’s perfect for tight side-yard spots. They reach 12 to 15 feet at maturity but stay only 3 to 4 feet wide, so they won’t encroach on your clearance zone. Plant them 3 to 4 feet from the generator and space them 2 to 3 feet apart for a solid privacy wall.
Holly (Inkberry or Winterberry) — Inkberry holly is an underrated pick. It’s native, tolerates partial shade (great for the shaded side of a house where generators often sit), and stays dense without heavy pruning. It grows 5 to 8 feet tall and offers dark green foliage year-round.
Dwarf varieties to consider: If your generator sits close to the house and you’re tight on space, look at compact options like Gem Box Inkberry Holly, North Star Boxwood, or Little Giant Arborvitae. These stay under 3 feet tall and won’t crowd the unit.
Planting tips for generator screening:
— Plant shrubs at least 3 feet from all sides of the generator (remember the 36-inch clearance rule).
— Choose species with shallow, non-invasive root systems. Deep-rooted plants can damage underground gas lines, electrical conduits, or the generator’s foundation pad.
— Leave a clear access path so a technician can reach the unit for annual maintenance. Don’t plant a complete ring — leave at least one side open or easily accessible.
— Mulch the bed around your plantings to suppress weeds and give the area a finished look, but keep mulch at least 12 inches from the generator base to reduce debris and fire risk.
If your generator’s exhaust has been browning or yellowing the grass nearby, evergreen shrubs planted at a safe distance won’t suffer the same fate — their woody stems and elevated foliage are well above the exhaust zone.
2. Ornamental Grasses: A Soft, Natural Screen
If formal evergreens aren’t your style, ornamental grasses offer a relaxed, natural-looking alternative. They grow fast, move beautifully in the breeze, and — critically for generator screening — they allow excellent airflow through their open structure.
Top ornamental grasses for hiding a generator:
Feather Reed Grass (Karl Foerster) — This is the go-to. It grows in a tight, upright clump that reaches 4 to 5 feet tall, stays narrow (about 2 feet wide), and holds its shape well through winter. It won’t flop over and block access to your generator. Plant a row of three to five clumps about 3 feet from the unit for a clean, modern screen.
Zebra Grass (Miscanthus sinensis ‘Zebrinus’) — Wider and more dramatic than feather reed grass, zebra grass reaches 5 to 7 feet tall with distinctive horizontal gold bands on the leaves. It’s a statement plant that draws the eye to the grass and away from whatever’s behind it.
Switchgrass (Panicum virgatum) — Native to North America and extremely low-maintenance. Varieties like ‘Heavy Metal’ grow upright to about 5 feet and turn a striking blue-gray color in summer. Switchgrass is drought-tolerant once established and handles heat from nearby exhaust better than most ornamentals.
Little Bluestem — A shorter option (2 to 4 feet) that works well if your generator is a smaller unit. The fall color — coppery orange turning to rust — is outstanding. It’s also native and practically maintenance-free.
Ornamental grasses are especially effective when combined with a low fence or screen on one side. The fence provides immediate coverage while the grasses fill in and soften the look over the first growing season. If you’re interested in how different grass types spread and fill gaps, our guide on how grass spreads covers the mechanics — the same principles of rhizome and clump growth apply to ornamental varieties.
3. Privacy Screens and Fencing: Instant Coverage
If you need to hide your generator now — not in two or three growing seasons — a privacy screen or fence section is the fastest solution. And thanks to the no-dig screen panels available today, you don’t even need to set posts or pour concrete.
Best screening options:
No-dig vinyl privacy screens — These are the most popular option on Amazon for a reason. Brands like Zippity Outdoor Products and Enclo make panels that simply stake into the ground. Most are 3 to 4 feet tall and 3 to 5 feet wide — the right size to shield a residential generator from one or two sides. They’re UV-resistant, weather-resistant, and never need painting. A two-panel L-shaped setup screens the generator from the street and yard while leaving the back open for airflow and maintenance.
Cedar wood privacy screens — If you want a more natural look, cedar screens offer warmth and character that vinyl can’t match. Greenes Fence and Enclo both sell cedar panels on Amazon that require no digging. Cedar naturally resists rot and insects, and it weathers to a beautiful silver-gray over time if left unstained.
Lattice panels — Lattice is a smart middle ground between full privacy and open airflow. The crisscross pattern blocks sightlines while allowing air to flow freely through the openings — which is exactly what your generator needs. You can also train climbing plants like clematis, jasmine, or climbing hydrangea up a lattice panel for a living wall effect. Just make sure the lattice is positioned at least 3 feet from the generator so the foliage doesn’t encroach on the clearance zone as it grows.
Louvered aluminum panels — These are the premium option. The angled louvers are specifically designed to block sightlines from the front while allowing air to exhaust freely out the back — essentially the same principle as the vents on the generator itself. They’re more expensive than vinyl or wood, but they look sharp and require zero maintenance.
For more ideas on adding structure and visual interest to your yard without breaking the bank, check out our guides on cheap landscaping ideas and simple front yard landscaping ideas.
4. Rock Gardens and Hardscaping: Low-Maintenance Concealment
If you’d rather not deal with watering, pruning, or seasonal maintenance around your generator, a rock garden or hardscape approach might be the perfect fit. Decorative stone and gravel look clean year-round, they won’t grow into the clearance zone, and they solve the common problem of dead grass patches around generators caused by exhaust heat and vibration.
How to build a rock garden around your generator:
Step 1: Define the area. Use landscape edging (steel or aluminum edging gives the cleanest lines) to create a rectangular or kidney-shaped bed that extends at least 3 feet from each side of the generator. This replaces the lawn area that would otherwise get scorched by exhaust or worn down by foot traffic during maintenance visits.
Step 2: Lay weed barrier fabric. Cover the exposed soil with commercial-grade landscape fabric. This prevents weeds from growing up through your rock bed — because weeding around a generator is nobody’s idea of a good time.
Step 3: Add your base layer. Fill the bed with 2 to 3 inches of decorative gravel or river rock. Popular choices include pea gravel (smooth and affordable), river rock (larger and more natural-looking), or lava rock (lightweight and excellent for drainage).
Step 4: Add feature boulders. Strategically placing two or three larger boulders (12 to 24 inches) around the generator creates visual interest and draws the eye to the rock garden rather than the metal box behind it. Position them toward the front and sides where the generator is most visible.
Step 5: Optional — add potted plants. Set a few decorative planters among the rocks for color and softness. The key advantage of potted plants is mobility — you (or a service tech) can simply slide them out of the way for generator access. Tall planters with ornamental grasses or evergreen shrubs make excellent movable screens.
A rock garden also pairs beautifully with a DIY garden path. Running a stepping-stone walkway from the rock garden toward a patio or garden bed ties the whole area together and makes the generator zone look intentional rather than like an afterthought.
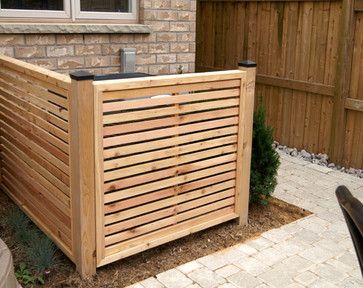
5. Decorative Potted Plants: Flexible and Movable
Potted plants are the most flexible screening option because they can be rearranged, moved for maintenance, and swapped out seasonally. If you’re renting, don’t want to commit to permanent landscaping, or need frequent generator access, this is the approach for you.
Best plants for container screening:
Tall ornamental grasses in large planters — A 20- to 24-inch planter with feather reed grass or purple fountain grass creates an instant 5-foot-tall screen that can be repositioned in minutes. Line three or four along the visible side of your generator.
Dwarf evergreens in decorative pots — Dwarf Alberta spruce, compact boxwood, or sky pencil holly in ceramic or composite planters provide year-round coverage with a polished, formal look.
Tall tropicals (seasonal) — In warmer months, large containers with canna lilies, elephant ears, or banana plants create dramatic, lush screens. These are seasonal in most climates but can be overwintered indoors.
Tips for potted plant screening:
— Use planters on casters or plant caddies for heavy containers. This makes it trivially easy to roll them aside for generator service.
— Weight matters — don’t go so large that the pots become immovable. A 16- to 20-inch pot is the sweet spot for most people.
— Position pots at least 3 feet from the generator. The exhaust side runs especially hot during extended outages, and plants placed too close will cook.
— Choose pots in colors that complement your home’s exterior for a cohesive look.
6. Generator Pads and Ground Cover: Clean Up the Base
Even if you screen the generator beautifully from all sides, a muddy, weedy, or dead-grass patch at the base ruins the whole effect. The ground directly under and around your generator takes a beating — exhaust heat, vibration, oil drips, and foot traffic from service visits all conspire to kill the turf.
The solution is to replace the lawn in the immediate generator zone with a clean, purpose-built surface.
Generator pad options:
Precast concrete pads — The standard approach. A precast GenPad or DiversiTech UltraLite pad raises the generator above grade, keeps it level, and prevents it from sinking into soft soil over time. These are available on Amazon and most come in sizes designed to match common Generac, Kohler, and Champion generators. A good concrete pad is typically 3 to 4 inches thick and sits on a compacted gravel base.
Poured concrete slabs — More permanent and stable than precast, but also more expensive and time-consuming to install. If you live in a flood-prone area or have very soft soil, a poured slab with proper footings is the gold standard.
Compacted gravel beds — The budget option. Remove the sod, dig down 3 to 4 inches, compact the soil, and fill with crushed stone or pea gravel. Frame the area with pressure-treated landscape timbers or steel edging for a clean border. Gravel drains well and won’t burn from exhaust heat. The downside: it can shift over time, potentially tilting the generator out of level.
Extending the clean zone: Even if your generator sits on a concrete pad, consider extending a 12- to 18-inch border of gravel or decorative stone around the pad. This creates a buffer between the generator and your lawn, eliminates the muddy ring that forms from splash-back during rain, and prevents grass from growing up into the unit’s ventilation.
If you’re dealing with dead patches near your generator and want to restore the surrounding lawn, our guide on reseeding over dead sod covers the repair process step by step.
7. Combination Approaches: The Best Results
The most convincing generator concealment usually combines two or three techniques rather than relying on just one. Here are a few combinations that work especially well:
The L-shaped screen + shrubs: Install a two-panel no-dig privacy screen on the two most visible sides of the generator (typically the street-facing side and the yard-facing side). Then plant a row of boxwood or inkberry holly along the outside of the screen. The fence provides instant coverage while the shrubs grow in over the next year or two. Eventually, the shrubs become the primary screen and the fence becomes invisible behind them.
The rock garden + ornamental grasses: Build a gravel bed with landscape edging around the full generator footprint. Add two or three feature boulders on the visible sides. Then plant tall ornamental grasses (in-ground or in pots) behind the boulders to create a layered, natural-looking screen. This approach requires almost zero maintenance and looks great in modern, minimalist yards.
The lattice + climbing plants + ground cover: Set up a lattice panel on the most visible side and train a climbing vine up it. Replace the lawn around the base with gravel or river rock. Add a few potted evergreens on the remaining exposed sides. Within one growing season, you’ll have a living wall with a clean, professional-looking base.
The budget approach: If you’re working with a tight budget, start with what’s free — rearrange existing potted plants to screen the generator from the most visible angle. Then invest $50 to $100 in a single no-dig privacy screen panel for the primary sightline. Over time, add shrubs or grasses as your budget allows. You don’t have to do everything at once. For more budget-friendly outdoor project ideas, see our full guide on designing a stunning front yard on a budget.
8. Generator Covers and Enclosures: Dedicated Products Worth Considering
Beyond landscaping, there are purpose-built products designed specifically to conceal and protect generators. These work well on their own or as part of a larger landscaping plan.
Generator covers (weather protection) — Heavy-duty waterproof covers protect your generator from rain, snow, UV damage, and debris when it’s not running. Brands like Champion, GenTent, and IGAN make covers for both portable and standby units. These aren’t concealment solutions on their own — they’re protective gear — but a clean, fitted cover looks far better than a bare metal housing, and some come in colors that blend with outdoor surroundings.
Running covers and tents — If you use a portable generator during outages, running covers (like the GenArmor or GenTent) allow you to operate the generator in rain or snow while keeping water out of the engine. They’re essential safety gear in wet climates.
Soundproof generator sheds — For the ultimate concealment and noise reduction solution, companies like GDLF make compact outdoor enclosures with built-in cooling fans and sound-dampening insulation. These are essentially small weatherproof cabinets that completely enclose a portable generator. They won’t work for large standby units, but for smaller generators they effectively make the unit disappear while also cutting noise levels significantly.
Faux rock covers — Hollow, lightweight fiberglass “boulders” designed to fit over utility equipment. They’re cheesy-sounding but surprisingly convincing from a distance, especially when combined with a rock garden. They’re available in various sizes and earth-tone colors to match natural stone.
9. What to Avoid: Common Mistakes That Cause Problems
When homeowners try to hide generators, a few mistakes come up over and over. Avoiding these will save you headaches (and potentially expensive generator repairs):
Don’t block the exhaust. The exhaust side of your generator (usually the left side as you face it) gets extremely hot during extended operation. Anything placed within 3 feet of the exhaust — plants, fencing, decorative items — risks heat damage or even fire. Always know which side your exhaust faces and keep that zone completely clear.
Don’t plant deep-rooted trees nearby. Tree roots can damage underground gas lines, electrical conduits, and the generator’s concrete pad. Stick to shallow-rooted shrubs and ornamental grasses within 10 feet of the unit. Save the oak trees and maples for elsewhere in the yard.
Don’t create a full enclosure. A generator is not a storage shed — it needs continuous airflow to cool itself and vent exhaust gases. Never fully enclose a standby generator with fencing, walls, or dense plantings on all four sides. Always leave at least one side (preferably two) open for air circulation.
Don’t forget about maintenance access. Your generator needs annual professional service, and the technician needs clear access to all sides. If your beautiful landscaping makes it impossible to reach the unit without hacking through shrubs, you’ve created a problem. Build in a maintenance path — a stepping-stone walkway or a removable section of fencing works well.
Don’t ignore local codes and HOA rules. Some municipalities and homeowner associations have specific requirements for screening utility equipment. A few even mandate it. Check your HOA covenants and local zoning codes before you start — you might find that your HOA requires screening, which gives you a great excuse to invest in the project.
Don’t let mulch or debris accumulate around the base. Leaves, grass clippings, and mulch that build up against the generator housing can block ventilation openings, trap moisture, and create a home for rodents and insects. Your fall yard cleanup routine should include clearing debris from around the generator.
10. Reducing Generator Noise With Landscaping
While you’re screening your generator visually, you can also take steps to reduce the noise it produces. Modern standby generators run at about 66 decibels at 23 feet — roughly the volume of a normal conversation — but that hum can get annoying during long outages, especially at night.
Landscaping won’t turn your generator into a whisper, but it can meaningfully reduce how loud it sounds from your patio, bedroom window, or your neighbor’s yard.
Sound-reducing landscaping strategies:
Dense shrub barriers — A thick row of evergreen shrubs (like arborvitae or holly) between the generator and your living spaces acts as a natural sound barrier. Dense foliage absorbs and scatters sound waves rather than reflecting them like a hard wall. The thicker and taller the planting, the more effective it is.
Earth berms — If you have the space and the budget, a low earth berm (a raised mound of soil, typically 2 to 3 feet tall) between the generator and the house is one of the most effective natural sound barriers available. Plant the berm with shrubs or ornamental grasses for an attractive finished look.
Solid fencing — A solid wood or vinyl privacy fence reduces noise more than lattice or louvered panels because it reflects sound waves back toward the source. A fence that’s at least 50% taller than the generator and positioned 3 to 4 feet from the unit can cut perceived noise levels noticeably.
Strategic placement — If you’re still in the planning stage (before the generator is installed), work with your installer to position the unit where the house itself acts as a sound barrier between the generator and your most-used outdoor spaces. Placing the generator on the opposite side of the house from your patio or deck makes a significant difference.
Anti-vibration pads — Much of a generator’s noise comes from vibration transferring through the mounting pad and into the ground. Rubber anti-vibration mounts or pads placed between the generator and its concrete base can reduce this mechanical noise. These are inexpensive and available on Amazon.
Recommended Products on Amazon
Here’s a quick reference of the products mentioned throughout this guide that are available on Amazon. These cover the full range from screening and fencing to generator pads and accessories.
Privacy screens and fencing:
— Zippity Outdoor Products no-dig vinyl privacy screens (various sizes and colors)
— Enclo Privacy Screens (WoodTek vinyl and cedar options)
— BELLEZE wood privacy fence panels (2- and 3-panel sets)
— Giantex no-dig air conditioner/generator fence panels
Generator pads and bases:
— DiversiTech UltraLite composite generator pads (multiple sizes)
— GenPad precast concrete generator mounting pads
Generator covers and enclosures:
— Champion Power Equipment weather-resistant generator covers
— GenTent storm shield running covers
— GenArmor heavy-duty running covers with windproof kits
— IGAN waterproof generator covers (multiple sizes)
— GDLF soundproof generator sheds with cooling fans
Standby generators (if you’re still shopping):
— Generac Guardian Series (10kW, 14kW, 18kW, 22kW, 24kW, and 26kW models available with WiFi monitoring and automatic transfer switches)
— Champion aXis 22kW home standby generator
— Westinghouse tri-fuel portable backup generators (12,500W to 28,000W)
Accessories:
— Anti-vibration rubber mounts and pads
— Generac cold weather kits (battery warmers and oil heater pads)
— Steel and aluminum landscape edging
— Commercial-grade landscape fabric / weed barrier
Final Thoughts
Hiding a generator doesn’t have to be complicated or expensive. A single no-dig privacy screen and a few strategically placed shrubs can transform your generator from a yard eyesore into something you barely notice. If you want to go further, combining a rock garden base with ornamental grass screening and a lattice accent creates a genuinely attractive landscape feature — one that happens to have a generator behind it.
The key principles to remember: maintain your safety clearances (36 inches on the sides, 5 feet from openings), keep at least one or two sides open for airflow and service access, and choose shallow-rooted plants that won’t interfere with underground utilities.
If you’re looking for more ways to improve your yard’s appearance, our guides on cheap landscaping ideas, small backyard garden ideas, and backyard ideas without grass are all packed with practical, budget-friendly projects. And if your generator has already done a number on the surrounding turf, start with our guide on how to revive dead grass fast to get that lawn looking right again.
How to Grow Tall Fescue from Seed: A Complete Step-by-Step Guide
Tall fescue is one of the most popular and adaptable lawn grasses in the United States — and unlike many premium turf options, it establishes beautifully from seed at a fraction of the cost of sod. Whether you’re starting a brand-new lawn, overseeding a thin or bare area, or transitioning from an older turf type, tall fescue seeding done correctly delivers dense, durable results in a single season.
This guide walks through everything you need to know: when to plant, how to prepare the soil, how to seed correctly, and what to do in the critical weeks after germination.
Why Tall Fescue?
Tall fescue is a cool-season grass that thrives in USDA Zones 4–7, with its strongest performance in the transition zone — the band of states from Kansas and Missouri through Virginia and the Carolinas where summers are too hot for most cool-season grasses but winters are too cold for warm-season types. It offers:
- Heat tolerance: Better than Kentucky bluegrass or perennial ryegrass in the transition zone
- Drought tolerance: Deep roots allow it to access moisture well below the surface
- Shade tolerance: Reasonable performance in 4+ hours of sun (better than Bermuda, not as good as St. Augustine)
- Durability: Handles moderate foot traffic well
- Moderate maintenance: Doesn’t need the intensive fertilizing or mowing of Bermudagrass
If you’re deciding between tall fescue and other cool-season grasses, our guide to choosing the right cool-season grass covers the full comparison. Our dedicated tall fescue species guide goes deep on long-term maintenance, variety selection, and common problems.

Tall Fescue Mix
Step 1: Choose the Right Tall Fescue Variety
Tall fescue has come a long way from older, coarser “Kentucky 31” types. Modern turf-type tall fescue (TTTF) varieties produce finer blades, darker green color, and denser growth habits that hold up much better as a home lawn. Look for:
- Turf-type varieties: Brands like Scotts, Pennington, Jonathan Green, and others sell blends of 2–4 turf-type tall fescue varieties. Using a blend rather than a single variety provides disease resistance and more consistent performance across varying soil and moisture conditions.
- Endophyte-enhanced seed: Many modern tall fescue varieties are infected with naturally occurring fungal endophytes that make the grass more resistant to surface-feeding insects (like sod webworms and armyworms). Look for “endophyte-enhanced” on the label.
- Germination rate: Check the label — target 85% or higher. Lower germination rates mean you’ll need to apply more seed to achieve comparable density.
Avoid Kentucky 31 (K-31) tall fescue for home lawns. It was bred as a pasture grass and has a coarser texture and lower density than modern turf-type varieties.
Step 2: Time Your Planting — Fall Is the Right Season
This is the most important factor in tall fescue seeding success, and it’s the opposite of warm-season grasses: tall fescue is planted in fall, not spring.
The ideal planting window is mid-August through mid-October across most of the transition zone and cool-season regions. The goal is to plant when:
- Soil temperatures have dropped to 50–65°F (the sweet spot for germination)
- Air temperatures are consistently below 75°F during the day
- There is still 6–8 weeks of moderate growing weather before the first frost
Fall seeding works for several reasons: weed pressure is lower than in spring, soil temperatures are cooling toward the optimal range, and the seedlings get to establish through fall and winter before facing their first summer heat. Spring-seeded tall fescue often germinates fine but then faces its first summer before roots are deep enough to handle heat stress.
If you miss the fall window, late winter to very early spring (before soil temperatures rise above 65°F) is a secondary option — but fall is nearly always preferable.
Step 3: Test Your Soil
A soil test costs $15–$30 through your local cooperative extension service or an online lab and is worth every dollar. Tall fescue performs best at a soil pH of 5.5–7.0. Outside this range, nutrients become less available and the grass struggles regardless of how well you seed or fertilize.
If your pH is too low (acidic), add lime before seeding and work it into the top few inches of soil. If it’s too high, sulfur can bring it down over time. Both adjustments take months to fully change soil pH, so testing and amending before seeding — rather than after — produces much better results.
Step 4: Prepare the Seedbed
Good seed-to-soil contact is the single most important mechanical factor in germination success. Achieve it with proper seedbed preparation:
- Kill existing vegetation: If converting an old lawn or weedy area, apply a non-selective herbicide (glyphosate) and allow 7–10 days before tilling. This ensures the herbicide has translocated to the roots before you disturb the plants.
- Till or loosen the soil: Rototill to a depth of 4–6 inches. This loosens compacted soil and allows the root system to develop properly. In established lawns being overseeded (not converted), core aeration accomplishes this without full tilling.
- Add amendments: Incorporate any lime, sulfur, or compost identified by the soil test. Compost improves both sandy and clay soils.
- Grade and smooth: Rake the area smooth and ensure the surface drains away from your home’s foundation. Fill any depressions that would collect water.
- Firm the seedbed: Roll lightly or use a flat drag to firm the surface. A firm, smooth seedbed is easier to seed evenly and makes better seed-to-soil contact.
For overseeding into an existing lawn (rather than a new conversion), the process is simpler: mow the existing lawn short (1.5–2 inches), core aerate aggressively, remove debris, then seed directly into the aerated surface. Our post on how to aerate and dethatch covers this process in detail.
Step 5: Apply Starter Fertilizer
Before seeding, apply a starter fertilizer formulated for new seedlings. Starter fertilizers have higher phosphorus content (the middle number in the N-P-K ratio) to support root development in germinating seed. Apply at label rates and rake lightly into the top inch of soil.
Do not use regular lawn fertilizer at seeding — the higher nitrogen levels can burn germinating seed and encourage fast top growth at the expense of root development. Our guide to the best starter fertilizers covers the top product options.
Step 6: Seed at the Correct Rate
Seeding rate for tall fescue:
- New lawn establishment: 6–8 lbs per 1,000 sq ft
- Overseeding thin existing lawn: 3–5 lbs per 1,000 sq ft
- Repairing bare patches: 8–10 lbs per 1,000 sq ft for faster fill-in
Tall fescue is a bunch-type grass — unlike Bermuda or Kentucky bluegrass, it doesn’t spread laterally to fill in gaps. This means seeding at the right rate and getting good coverage from the start is especially important. Thin seeding on tall fescue results in a clumpy, uneven lawn that doesn’t self-repair well.
Use a rotary spreader and apply half the seed walking north-south, then the other half east-west. After seeding, lightly rake the surface so seed is covered by no more than ¼ inch of soil — tall fescue seed is larger than Bermuda seed and can be buried slightly deeper, but still shouldn’t be more than ¼ inch down.
Step 7: Water Consistently Until Germination
Tall fescue germinates in 7–14 days under ideal conditions (soil temperature 50–65°F, consistent moisture). During this window, the seedbed must stay moist:
- Water 2–3 times daily with short irrigation cycles (5–10 minutes each)
- The goal is to keep the top inch of soil damp but not soaked
- As seedlings emerge and develop, gradually shift to less frequent, deeper watering
- Once seedlings reach 1.5–2 inches, water once daily in the morning; then taper to every other day as roots deepen
Always water in the morning when possible — watering in the evening leaves moisture on the blades overnight, which promotes fungal disease development in both new seedlings and established turf. Our guide on the best times to water grass covers why this matters.
Step 8: First Mowing
Wait until tall fescue seedlings reach at least 3–3.5 inches before the first mowing. Mowing too soon can physically uproot seedlings before their root systems are established. For tall fescue, a mowing height of 3 to 4 inches is generally recommended — taller than most people instinctively mow, but tall fescue performs best at this height. Higher mowing promotes deeper rooting and shades out weed seeds.
Ensure mower blades are sharp before that first mowing — dull blades tear rather than cut, stressing young plants. Our post on how to sharpen mower blades covers the process. For the general principles behind mowing height and frequency, see our mowing height guide.
Step 9: Ongoing First-Year Care
Fertilizing: Apply a follow-up fertilizer (a balanced or nitrogen-focused product) about 6–8 weeks after germination. In fall-seeded lawns, there’s typically time for one additional fertilization in late fall before growth slows for winter. Spring fertilization the following year continues the program. Our guide on how often to fertilize your lawn helps you build a full calendar.
Weed management: Broadleaf weeds that emerge with the new seeding can be controlled with post-emergent herbicides once the lawn has been mowed 2–3 times. Wait at least 6–8 weeks after germination before any herbicide application. Apply pre-emergent herbicides for crabgrass control the following spring — not during establishment, as they prevent grass seed germination too. Our post on pre-emergent herbicides for crabgrass covers spring application timing and product selection.
Foot traffic: Stay off new seedings as much as possible for the first 4–6 weeks. Even a well-germinated new lawn has a fragile root system and doesn’t handle traffic well until fully established.

Our Favorite Liquid Fertilizer
Overseeding Tall Fescue in an Established Lawn
Tall fescue is a bunch-type grass that doesn’t spread or self-repair via lateral growth like Bermuda or Kentucky bluegrass. This means annual or biennial overseeding is often part of the maintenance routine for tall fescue lawns — it maintains density, fills in any thin spots, and refreshes the stand with newer, disease-resistant varieties.
The process for overseeding into an existing tall fescue lawn:
- Mow the lawn short (1.5 inches)
- Core aerate to create seed-to-soil contact without full tilling
- Apply seed at 3–5 lbs per 1,000 sq ft
- Apply starter fertilizer
- Water as described above through germination
Timing is the same: mid-August through mid-October in most of the transition zone and cool-season regions.
Tall Fescue from Seed: Common Questions
Can I seed tall fescue in spring?
You can, but the results are often disappointing. Spring-seeded tall fescue germinates fine but then faces its first summer — heat, drought, and potential disease pressure — before the root system is deep enough to handle it. Fall seeding is strongly preferred.
How long until I have a full lawn?
A fall-seeded tall fescue lawn will look reasonably full by the following spring. Full density — a lawn that looks finished and is ready for normal traffic — typically arrives in the spring to early summer of year two.
Why is my tall fescue coming in clumpy?
Tall fescue is a bunch-type grass and naturally grows in clumps rather than spreading to fill space. If clumping is extreme, it usually indicates seeding that was too thin or too uneven. Overseeding the thin areas between clumps in the following fall will improve uniformity over time.
Summary: Tall Fescue Seeding Timeline
- Late summer: Soil test, prepare, grade, aerate, apply starter fertilizer, seed
- Days 7–14: Germination under good conditions
- 3–4 weeks: First mowing at 3–3.5 inches
- 6–8 weeks: First follow-up fertilizer application
- Following spring: Lawn looks full; begin normal mowing and fertilizing schedule
- Year 2: Fully established; annual overseeding as needed to maintain density
Tall fescue is one of the most rewarding lawn grasses to grow from seed — adaptable, durable, and achievable in a single season when planted correctly. Get the timing right, prepare your soil, and give the seedlings consistent moisture, and you’ll have a lawn that handles both summer heat and winter cold better than most alternatives in the transition zone.
How to Grow Bermuda Grass from Seed: A Step-by-Step Guide
Growing a Bermuda grass lawn from seed is one of the most rewarding and cost-effective lawn projects a homeowner can tackle. Compared to sod installation, seeding costs a fraction of the price — and when done correctly, delivers a dense, healthy turf in a single growing season. The key is understanding Bermuda’s specific requirements and getting the timing right. This guide walks through everything from soil preparation to first mowing.
Why Choose Bermuda Grass?
Before getting into the how-to, it’s worth confirming that Bermuda grass is the right choice for your climate and yard. Bermudagrass is a warm-season grass that thrives in USDA Zones 7–10 — primarily the South, Southwest, and transition zone. It demands full sun (6+ hours daily minimum), handles heat and drought exceptionally well, and recovers quickly from traffic and wear. It’s the top choice for home lawns, athletic fields, and golf course fairways across the southern half of the country.
If you have significant shade, are in a northern climate, or want a lower-maintenance option, Bermuda may not be the best fit. Our warm-season grasses guide compares all the major warm-season options and our complete Bermudagrass overview covers the long-term picture for this species.

Click for our favorite Bermuda grass seed
Step 1: Choose the Right Seed
For seeded Bermuda lawns, you’ll be planting common-type Bermudagrass (hybrid varieties like Tifway 419 can only be installed as sod or sprigs — they don’t produce viable seed). Within common Bermudagrass seed, the most important distinction is hulled vs. unhulled:
- Hulled seed: The outer coating has been removed. Germinates in 7–14 days under good conditions. This is what you want for home lawn use.
- Unhulled seed: Retains its natural coating. Germinates slowly and inconsistently — sometimes taking weeks. Generally not the best choice for a lawn you’re trying to establish this season.
Coated seed (seed wrapped in a clay or polymer coating that holds moisture) is also widely available and helpful if your soil dries out quickly between waterings. The coating adds weight but not seed — check the “pure seed percentage” on the label for accurate comparisons between products.
For full product comparisons and top picks, see our best Bermuda grass seed guide.
Step 2: Time It Right
Timing is critical. Bermuda grass seed needs:
- Soil temperature: Consistently above 65°F (70–85°F is ideal)
- Air temperature: Daytime highs above 80°F
- Full growing season ahead: At least 3–4 months before your first expected frost
In most of the South, the optimal planting window is late April through mid-June. Planting too early (when soil is still cool) leads to slow, patchy germination. Planting too late risks seedlings being immature when fall temperatures arrive.
Avoid fall seeding for Bermuda grass. Unlike tall fescue or Kentucky bluegrass (which are planted in fall), Bermuda seeded in September often fails to establish before winter dormancy kills young plants.
Step 3: Test and Prepare Your Soil
A soil test before planting is one of the most useful investments you can make. It tells you your soil’s pH and nutrient levels, so you can correct problems before they’re buried under seed and new grass. Bermuda grass grows best at a soil pH of 6.0–7.0. Most extension services and online testing labs can process a basic soil test for $15–$30 and provide fertilizer recommendations along with results.
Soil preparation steps:
- Kill existing vegetation: Use a non-selective herbicide (non-glyphosate) to kill weeds, old turf, and unwanted grass. Wait 7–10 days before tilling so the herbicide has time to work.
- Till the soil: Loosen the top 4–6 inches of soil with a rototiller. This improves drainage, reduces compaction, and gives the new seed’s root system room to develop.
- Add amendments: Based on soil test results. Lime if pH is below 6.0; sulfur if above 7.0. Incorporate organic matter (compost) if you have heavy clay or very sandy soil.
- Grade the area: Rake the surface smooth and ensure the grade slopes gently away from structures to direct water flow away from the foundation. Fill any low spots that would collect water.
- Firm the seedbed: A light roller pass (or a flat drag) will remove air pockets and create a firm, smooth surface that makes good seed-to-soil contact easier to achieve.
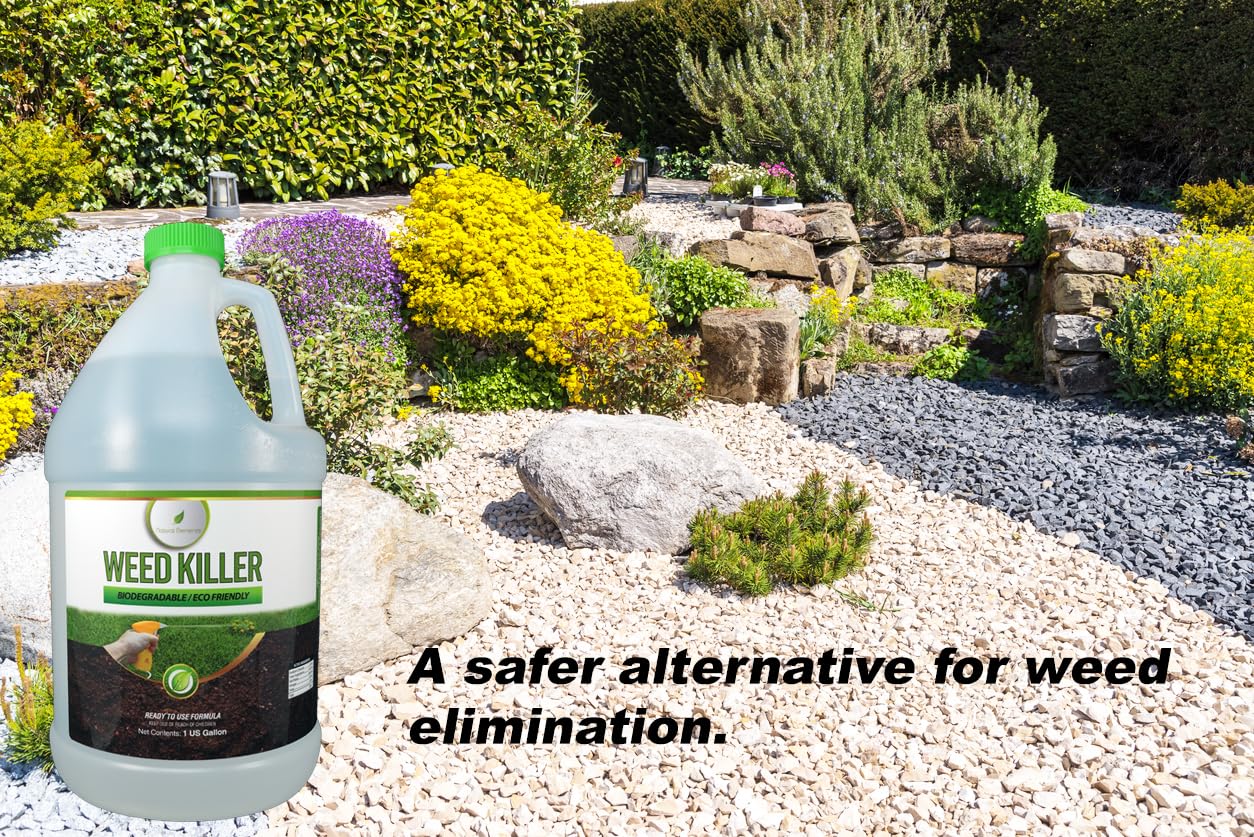
Version 1.0.0
Step 4: Apply Starter Fertilizer
Before seeding, apply a starter fertilizer to give the germinating seedlings a nutritional head start. Starter fertilizers are formulated with higher phosphorus content to promote root development in new seedlings. Apply according to label directions and rake or drag it lightly into the top inch of soil.
Our post on the best starter fertilizers covers what to look for and top product picks for new lawns.
Step 5: Seed the Lawn
Bermuda grass seed is tiny — a quality spreader is important for even distribution. A rotary (broadcast) spreader works well for most applications. For smaller areas or patch seeding, a hand-held broadcaster is fine.
Seeding rates:
- New lawn: 1.5–2 lbs of hulled seed per 1,000 sq ft
- Overseeding thin existing Bermuda: 1 lb per 1,000 sq ft
Click for our favorite Bermuda grass seed
Technique: Apply half the seed in one direction (north-south), then apply the other half perpendicular (east-west). This cross-pattern approach helps eliminate streaks and bare strips from uneven spreader passes. After seeding, rake the seed lightly into the top ¼ inch of soil — don’t bury it deeper. Bermuda seed is small and needs light and warmth to germinate; deep burial slows or prevents germination.
Lightly rolling after seeding improves seed-to-soil contact, which is one of the most important factors in successful germination.
Step 6: Water Consistently During Germination
This is the stage where most seeding projects succeed or fail. During germination, the seedbed must stay consistently moist — but not waterlogged. The top inch of soil should feel damp but not saturated at all times until germination is complete and seedlings reach 1–2 inches tall.
Practical watering schedule during germination:
- Water 2–3 times daily with short cycles (5–10 minutes each) rather than one long soak
- Do this consistently for the first 7–14 days until germination is clearly underway
- Gradually shift to less frequent, deeper watering as seedlings establish (reducing to once daily, then every other day)
The principles behind timing and frequency are covered in our post on the best times to water grass. The short version: water in the early morning to reduce evaporation and disease pressure.
Step 7: First Mowing
Resist the urge to mow too early. Wait until Bermuda seedlings reach at least 1.5–2 inches tall before the first cut. Early mowing on immature seedlings can uproot plants that haven’t yet developed stable root systems.
Set the mower to its highest setting for the first mowing, then gradually lower over subsequent mowings to your target height. Bermudagrass is typically maintained at 0.5–1.5 inches for a maintained home lawn, or 1–2 inches if you prefer a less aggressive cut. Never remove more than one-third of the blade in a single mowing session — this rule applies even more critically to young lawns.
Make sure your mower blades are sharp before that first cut. Dull blades tear and stress young seedlings. If you haven’t sharpened recently, our post on how to sharpen mower blades walks through the process.
Step 8: First-Year Care
After the lawn is mowing-ready, shift into a standard maintenance routine:
- Fertilizing: Apply your first post-establishment nitrogen fertilizer about 6–8 weeks after germination. This is the first of several applications you’ll make during the growing season. Our guide on how often to fertilize your lawn covers the full schedule.
- Weeds: Post-emergent broadleaf herbicides can be applied once the lawn has been mowed 2–3 times and is actively growing. Be careful with new seedings — some herbicides can damage young turf. Pre-emergent herbicides should wait until the following spring season. Our guide on pre-emergent herbicides for crabgrass covers what to apply and when in year two.
- Watering: Once established, Bermuda is drought-tolerant. Taper irrigation during the growing season — deep, infrequent watering promotes deeper roots than frequent shallow watering.
- Traffic: Stay off new seedlings as much as possible during the first 4–6 weeks. Young Bermuda plants are fragile and don’t handle foot traffic well until rooted.
Troubleshooting Common Problems
Patchy, uneven germination: Most often caused by inconsistent moisture or uneven seeding. Water more consistently and overseed thin areas with a hand spreader.
No germination after 3 weeks: Check soil temperature (too cool?), seed burial depth (too deep?), and moisture level (drying out between waterings?). In most cases, soil temperature and moisture are the culprits.
Weeds coming up along with the grass: Normal during establishment — weed seeds are opportunistic. Avoid pre-emergent herbicides while establishing from seed. Remove weeds by hand in the first weeks; apply post-emergent broadleafs carefully after the lawn is established.
Thin coverage after one season: Bermuda fills in via rhizomes and stolons once established. If coverage is thin after the first growing season, overseed in the following spring at 1 lb of hulled seed per 1,000 sq ft during active growth. The grass will fill in more aggressively in year two.
Click for our favorite Bermuda grass seed
Summary: Bermuda Grass from Seed Timeline
- Day 0: Soil test, prep, grade, add starter fertilizer, seed
- Days 7–14: Germination under good conditions
- Days 21–30: Seedlings 1.5–2 inches — first mowing
- Weeks 6–8: First post-establishment fertilizer application
- Season end: Full coverage with established root system
- Year 2: Fully mature, dense lawn with normal maintenance
Bermuda grass rewards patience and proper timing with a durable, attractive lawn that handles everything summer can throw at it. Take care of the details during establishment, and you’ll have a lawn that takes care of itself for years afterward.
Best Bermuda Grass Seed: Top Picks for a Dense, Heat-Tolerant Lawn
Bermudagrass is one of the most widely grown warm-season lawn grasses in the United States, and for good reason — it handles heat, drought, and heavy foot traffic better than nearly any other turf option. Establishing a new Bermuda lawn or overseeding a thin one starts with choosing the right seed. The options on Amazon and at garden centers range from budget common-type seed to premium coated varieties bred for specific performance traits, and understanding the differences will save you money and frustration.
This guide covers the best Bermuda grass seed options available, what to look for on the label, and how to match the right product to your situation.
Note: As an Amazon affiliate, Finest Lawns earns a commission on qualifying purchases at no extra cost to you.
What to Look for When Buying Bermuda Grass Seed
Before diving into specific products, a few concepts will help you read labels and make a better buying decision:
Common vs. Hybrid Bermuda
Common Bermudagrass is available as seed and is the standard for most home lawns. Hybrid varieties (like Tifway 419, Celebration, or TifTuf) produce superior turf but are sterile — they can only be installed as sod or sprigs, not seed. If you’re buying seed, you’re buying common Bermuda or a common-type improved variety.
Hulled vs. Unhulled Seed
Bermuda grass seed comes in two forms. Hulled (de-hulled) seed has had the outer coating removed, which dramatically improves germination speed and consistency — typically 7–14 days. Unhulled seed retains its natural coat and germinates more slowly and unpredictably, sometimes taking weeks. For home lawns, always choose hulled seed unless you have a specific reason otherwise.
Seed Coating
Many premium seeds are coated with a clay-based coating that holds moisture, improves seed-to-soil contact, and can include starter fertilizer or fungicide. Coated seed weighs more per bag than uncoated seed — so a 10 lb bag of coated seed contains less actual seed than 10 lbs of uncoated. Check the label for “pure seed” percentage to make accurate comparisons.
Germination Rate and Purity
The seed label (required by law) will list germination percentage (how many seeds are expected to sprout) and purity (how much of the bag is actually the stated grass species vs. inert material, other crop seeds, or weed seeds). Higher is better on both counts. Avoid any product listing detectable weed seed percentages.
Best Bermuda Grass Seed: Our Top Picks
1. Scotts Turf Builder Bermudagrass — Best Overall for Home Lawns
Scotts Turf Builder Bermudagrass is the most widely available and consistently reliable Bermuda seed for home use. It uses Scotts’ proprietary WaterSmart coating technology, which absorbs water and holds it near the seed to improve germination in variable weather conditions. The seed is hulled for fast germination and the coating includes a starter fertilizer component.
It’s available in multiple bag sizes — typically 5 lb and 10 lb — making it practical for both small patch repairs and full lawn overseedings. Germination typically occurs in 7–14 days under good conditions (warm soil, consistent moisture).
Best for: Full lawn establishment, overseeding, homeowners who want a well-supported brand with broad retail availability
Coverage: ~5,000–10,000 sq ft depending on application rate
Establishment: Seeding to full coverage in one growing season
2. Pennington Smart Seed Bermudagrass — Best Water-Efficient Option
Pennington Smart Seed is coated with Pennington’s porous coating that holds moisture while allowing oxygen to reach the seed. The brand claims this coating technology results in a lawn that requires 30% less water than uncoated seed once established — a claim based on the grass variety’s characteristics combined with the coating’s germination benefits.
The Bermudagrass in Pennington’s Smart Seed line is a fine-bladed, improved common type with good density and color. It performs well across the South and transition zone and is a strong contender against Scotts at similar price points.
Best for: Water-conscious homeowners, hotter climates where summer irrigation is a concern
Coverage: ~5,000 sq ft (new lawn) or up to 10,000 sq ft (overseeding)
Germination: 7–14 days
3. Hancock Seed Bermuda Grass Seed — Best Bulk Value
Hancock Seed is a Florida-based seed company that sells high-quality certified turfgrass seed in bulk quantities at significantly lower per-pound prices than retail brands. Their hulled Bermuda grass seed is particularly popular with homeowners establishing large lawns (half an acre or more) where the cost of premium retail bags would become prohibitive.
The seed is available in 5 lb, 25 lb, and 50 lb bags. It’s uncoated, which means slightly different watering needs during establishment compared to coated products, but the seed quality is certified and the germination rates are strong. This is a favorite among experienced DIY lawn growers and those establishing new lawns from scratch on large properties.
Best for: Large area establishment, cost-conscious homeowners, experienced DIYers
Coverage: Variable by quantity purchased — 50 lbs covers approximately 25,000 sq ft at new-lawn rates
Germination: 7–14 days (hulled)
4. Vigoro Bermudagrass Grass Seed Mixture — Best Budget Option
Vigoro (a Home Depot house brand) offers a budget-friendly Bermuda grass seed that performs reasonably well for overseeding and patch repair on established lawns. It’s coated and uses hulled seed for reliable germination. The price per square foot is lower than Scotts or Pennington, making it an accessible option for homeowners with smaller budgets or smaller areas to cover.
The tradeoff compared to premium brands is slightly lower germination consistency and no premium coating technology. For large new lawns, you’d likely do better with Hancock bulk seed. For small patches and overseeding, Vigoro gets the job done at a lower cost.
Best for: Small patch repairs, budget overseeding projects, HomeDepot shoppers
Coverage: ~5,000 sq ft per bag (check label for specific bag size)
Germination: 10–21 days
5. SeedRanch Hulled Bermuda Grass Seed — Best for Fast Germination
SeedRanch specializes in pure, certified turfgrass seed sold directly to consumers through Amazon without the retail markup of major brands. Their hulled Bermuda grass seed has excellent germination rates — typically 85–90% or higher as stated on the label — and fast germination in warm soil (often 5–10 days).
This is a good option for homeowners who want reliable, high-quality seed without the cost of coating, and who are comfortable managing moisture during establishment carefully. The uncoated format requires consistent watering to keep the seedbed moist until germination, but the actual seed performance is strong.
Best for: Homeowners who want certified seed, fast establishment, Amazon Prime buyers
Coverage: ~5,000 sq ft (new lawn) at 2 lbs/1,000 sq ft
Germination: 5–14 days in warm soil
When to Plant Bermuda Grass Seed
Timing is as important as seed selection. Bermuda grass seed requires soil temperatures of at least 65°F to germinate, and it establishes best when soil temperatures are between 70°F and 85°F. In most of the South, this means late spring planting from late April through June is ideal. Planting in fall risks poor germination and seedling death from early cool temperatures before the plants are established.
Our full guide on how to grow Bermuda grass from seed covers the complete planting process, soil preparation, germination care, and first-year maintenance in detail.
Seeding Rates for Bermuda Grass
Seeding rate affects how quickly you achieve full coverage:
- New lawn establishment: 2–3 lbs of hulled seed per 1,000 sq ft
- Overseeding a thin existing lawn: 1–2 lbs per 1,000 sq ft
- Repairing bare patches: 3–4 lbs per 1,000 sq ft for fast fill-in
Higher rates give faster coverage but aren’t always necessary for good results. Going significantly over the recommended rate can cause seedling competition issues and isn’t more effective per dollar spent.
What to Pair with Your Bermuda Grass Seed
Bermuda grass seed works best with a starter fertilizer at planting time to feed the developing root system. Our post on the best starter fertilizers covers what to look for and which products perform well. A pre-emergent herbicide is not compatible with seeding — it will prevent your Bermuda seed from germinating just as readily as it prevents crabgrass. Hold off on pre-emergent applications until the lawn has established and you’re in a future season’s weed prevention window.
For more on the full warm-season grass landscape and how Bermuda compares to alternatives, our warm-season grasses guide is a helpful reference, and the Bermudagrass species page covers long-term care and maintenance after your new lawn is established.
Summary: Best Bermuda Grass Seed at a Glance
- Best Overall: Scotts Turf Builder Bermudagrass — reliable, widely available, good coating technology
- Best Water-Efficient: Pennington Smart Seed Bermudagrass — solid performer with moisture-retention coating
- Best Bulk Value: Hancock Seed Hulled Bermuda — certified quality at low per-pound cost
- Best Budget: Vigoro Bermudagrass — accessible and decent for overseeding and patch repair
- Best Germination Speed: SeedRanch Hulled Bermuda — high purity, certified, fast-sprouting
Any of these products can establish a beautiful Bermuda lawn with proper soil preparation, correct planting timing, and consistent moisture management during germination. Seed quality matters, but technique matters just as much — so if you’re starting from scratch, take the time to read through our Bermuda grass from seed guide before you plant.